Learn Flow The Easy Way
Learn how you can use Salesforce Flow to automate boring data tasks by walking through these 4 sample scenarios.
Salesforce Flow has emerged as the primary tool for automating business processes within the Salesforce ecosystem. With Salesforce's decision to retire process builder, understanding and mastering Flow has become essential for businesses using Salesforce. In this article, we'll delve into the fundamentals of Flow and explore real-world scenarios to illustrate its practical applications.
Basics Of Flow
Flow is a visual automation tool, operating under the principle of "clicks not code." Workflows can be built using prebuilt elements to turn business logic into data automation.
All flows can be categorized into two main scenarios:
- Updating data in the background
- Collecting information from the user
Flows are constructed using elements, which perform specific tasks. These elements are grouped into three categories:
- Data: Manipulate existing or new data in Salesforce.
- Logic: Make decisions and navigate data.
- Interaction: Utilize prebuilt actions for various tasks.
Additionally, Flow resources, such as static or dynamic data storage and calculations, can be accessed via the Toolbox on the left-hand side of the interface.
Scenario 1 - Updating Field Data Based on Record Type
Consider a common business automation scenario: updating fields on a record based on its type. For instance, let's say we have three record types for cases: Email, Phone, and Text. We need to update specific fields like Subject and Status based on the record type.
How to Achieve This in Process Builder
To build this in process builder,
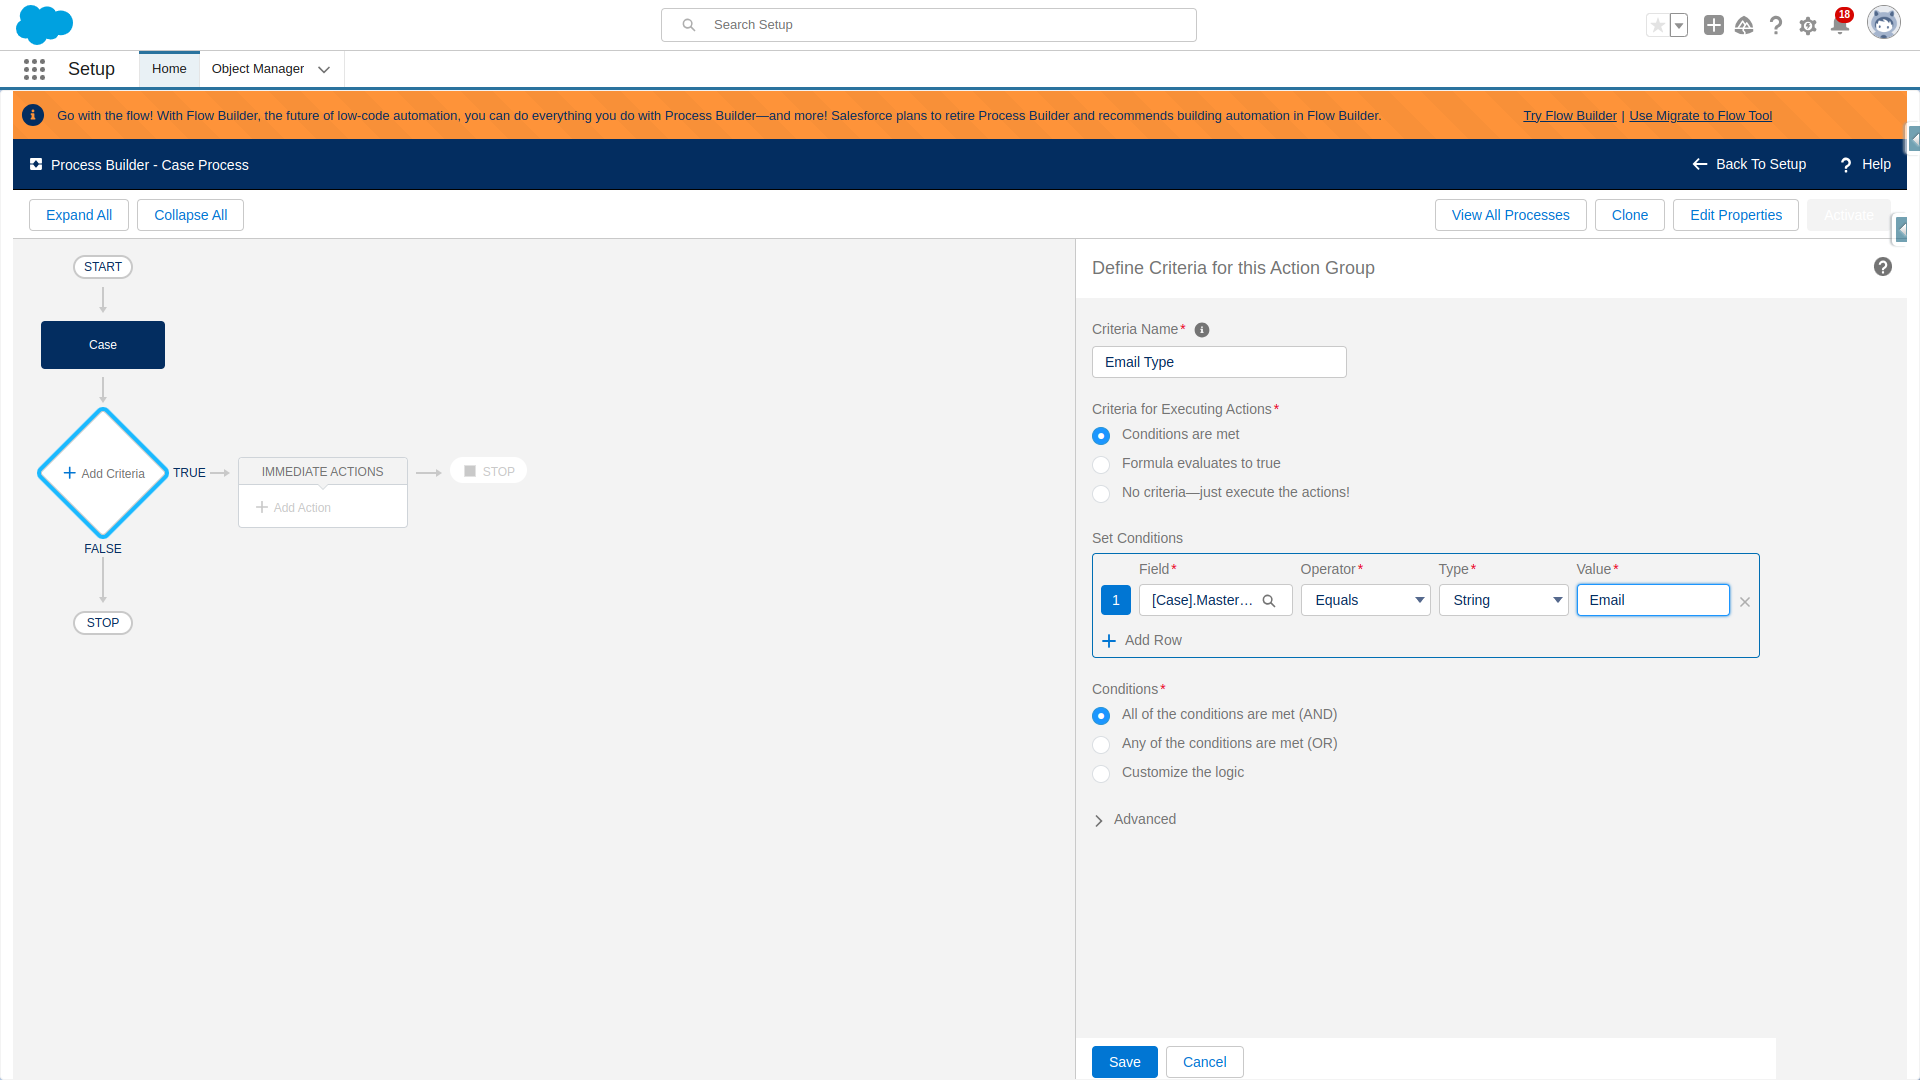
We start off by creating a new process, Case Process. This will run when the Case object is created or edited
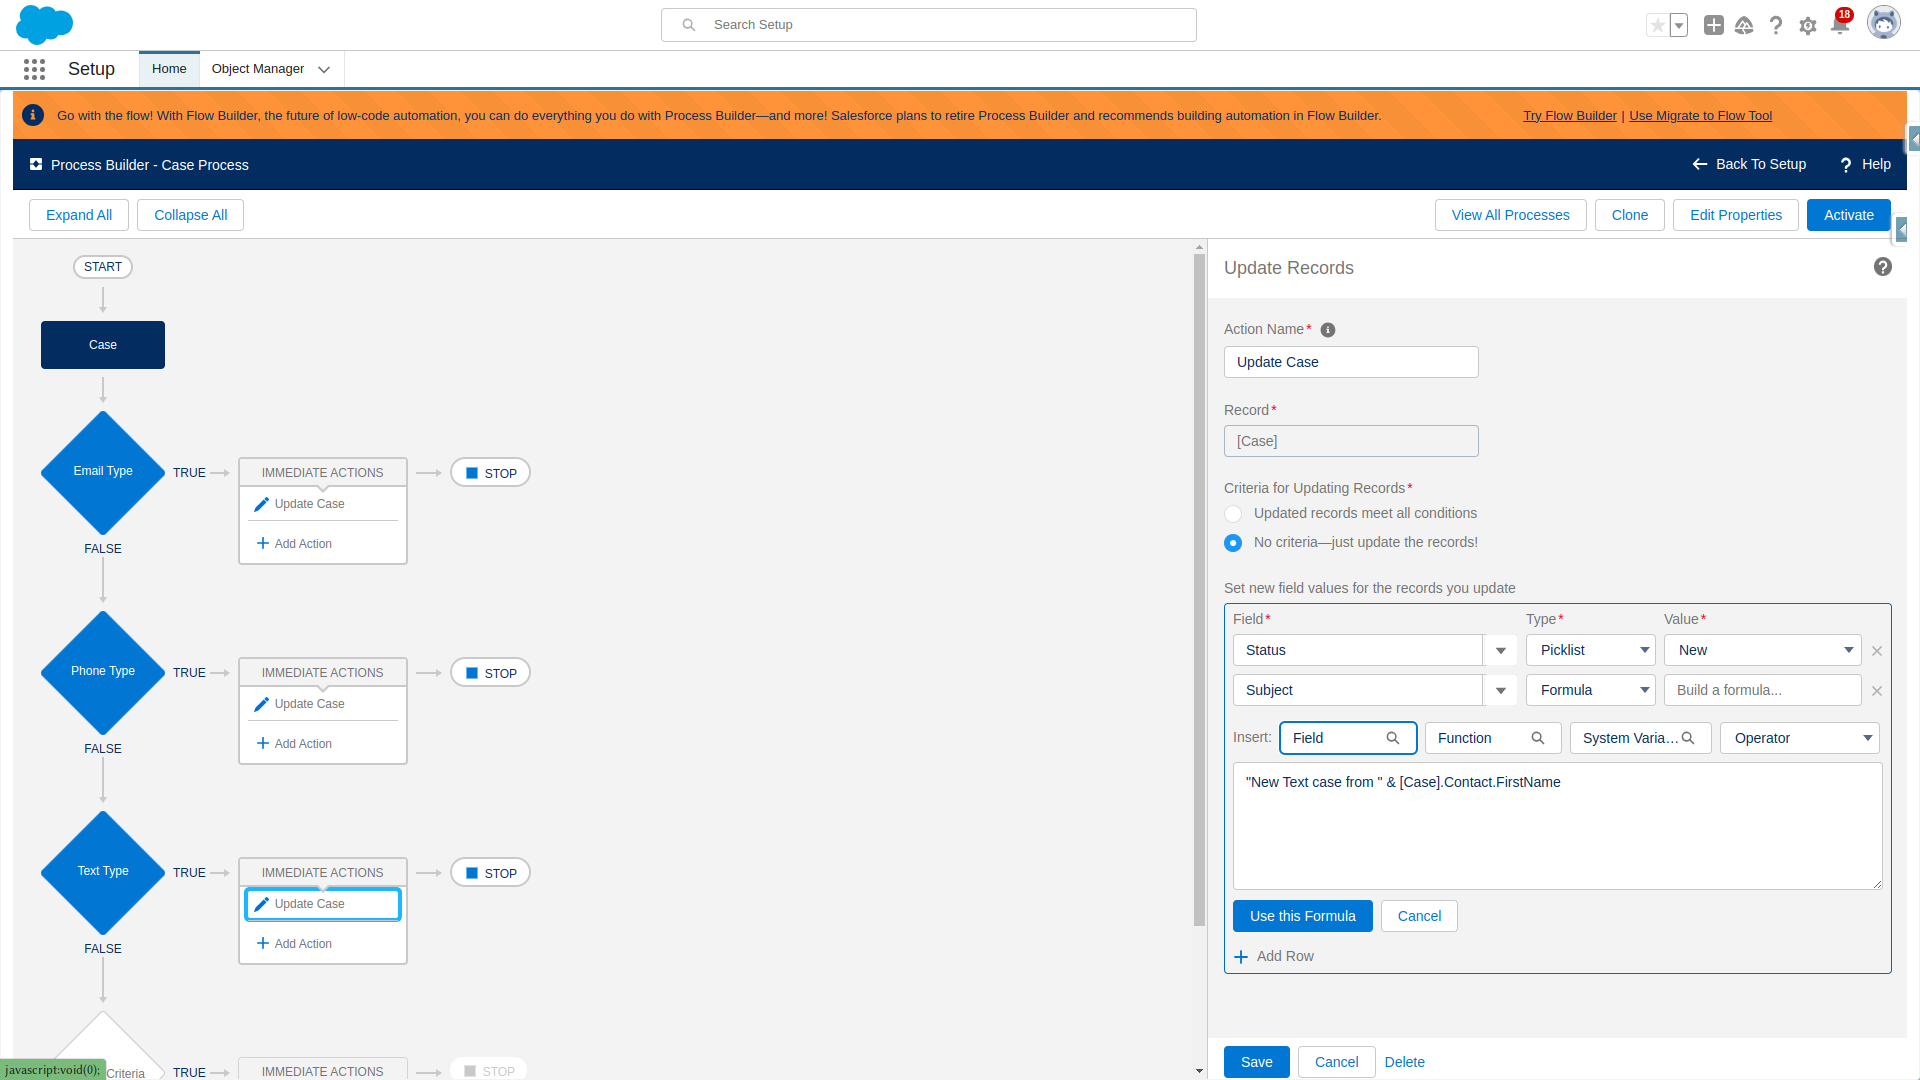
From here we can add a branch to check if the case record has a record type of email. Then, we can update the case with some specific values.
- Status = New
- A unique subject that references the contact's first name.
We can then duplicate this branch by doing the same for phone and text.
You can see the final product here.
Building in Flow
And if we want to replicate this functionality inside of flow:
- Create a new record-triggered flow
- Selecting the case object
- Trigger when
A record is created or updated - Select Optimize for
Fast Field Updates
From here, we can use the Decision element to check the record type. Give the element a name, and look at the record's record type's name.
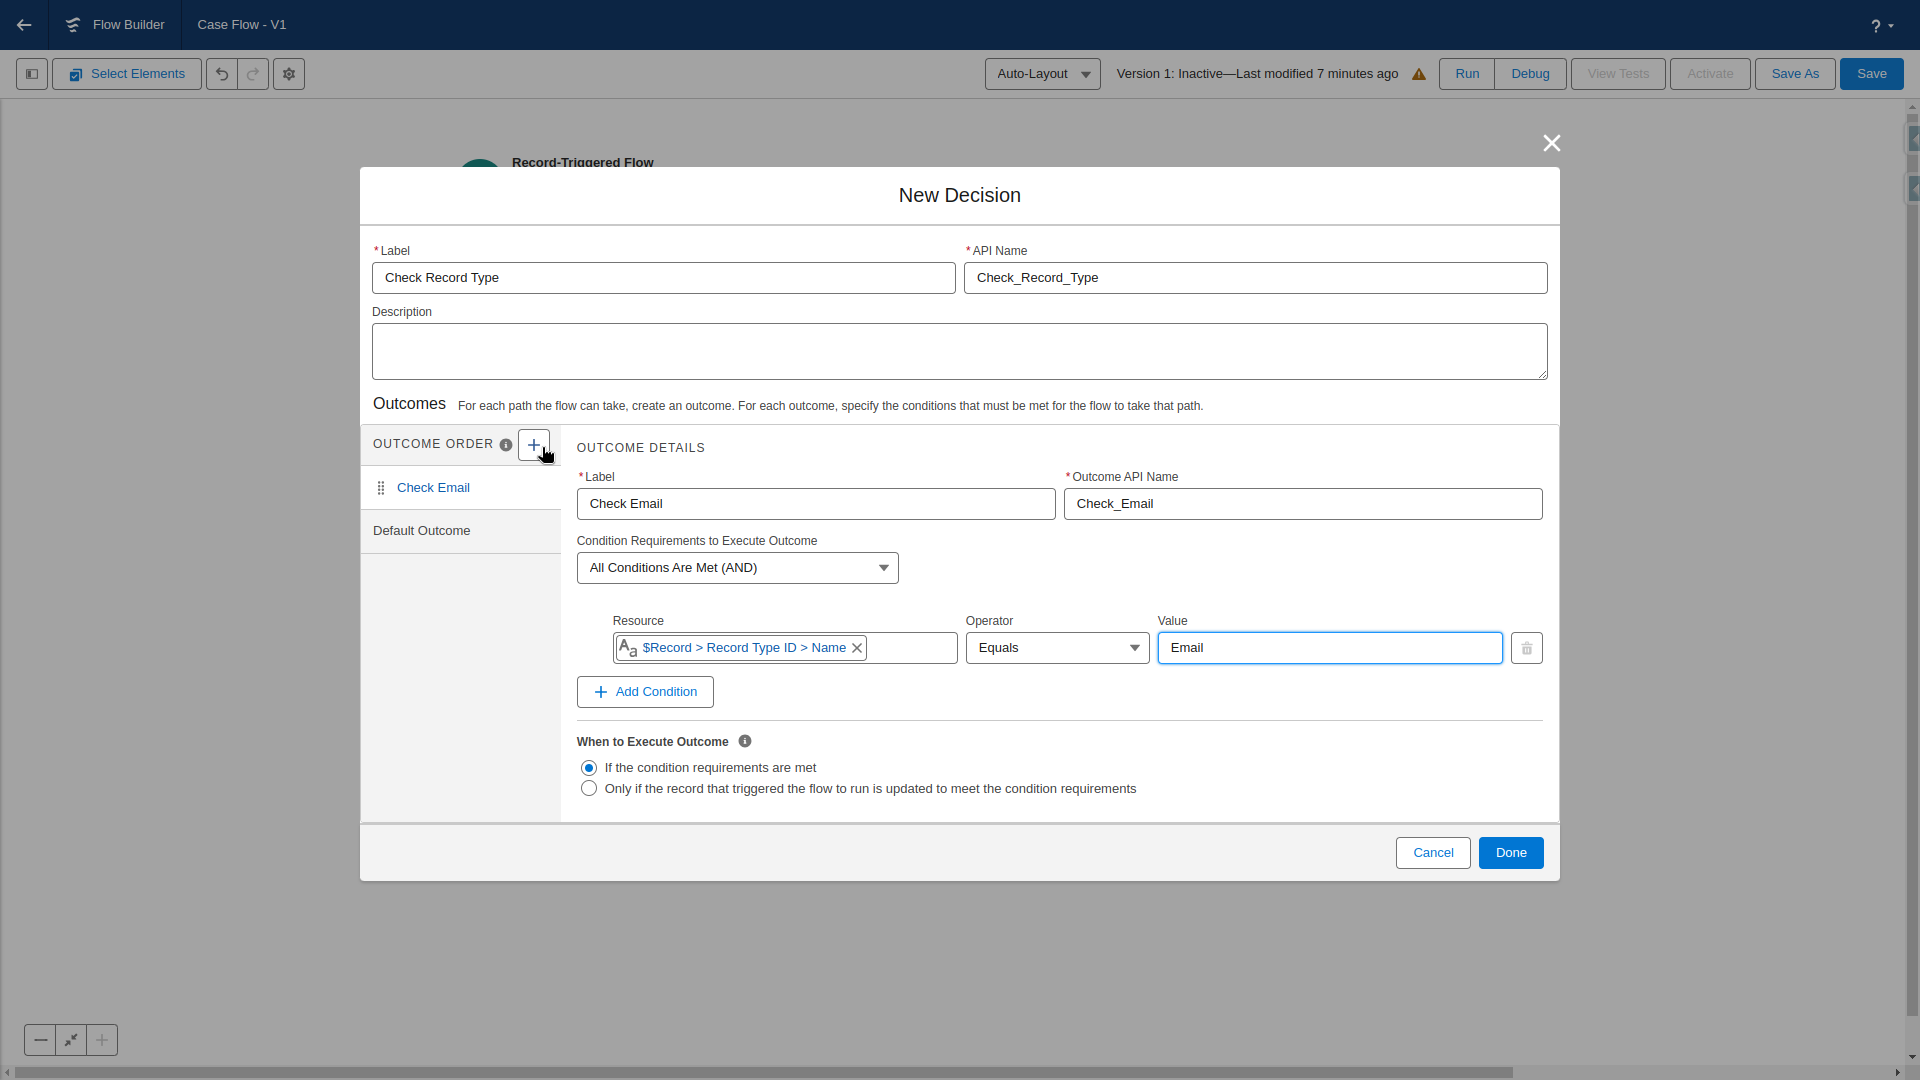
We can use this plus element to create additional decisions, and duplicate all decisions for Phone and Text types.
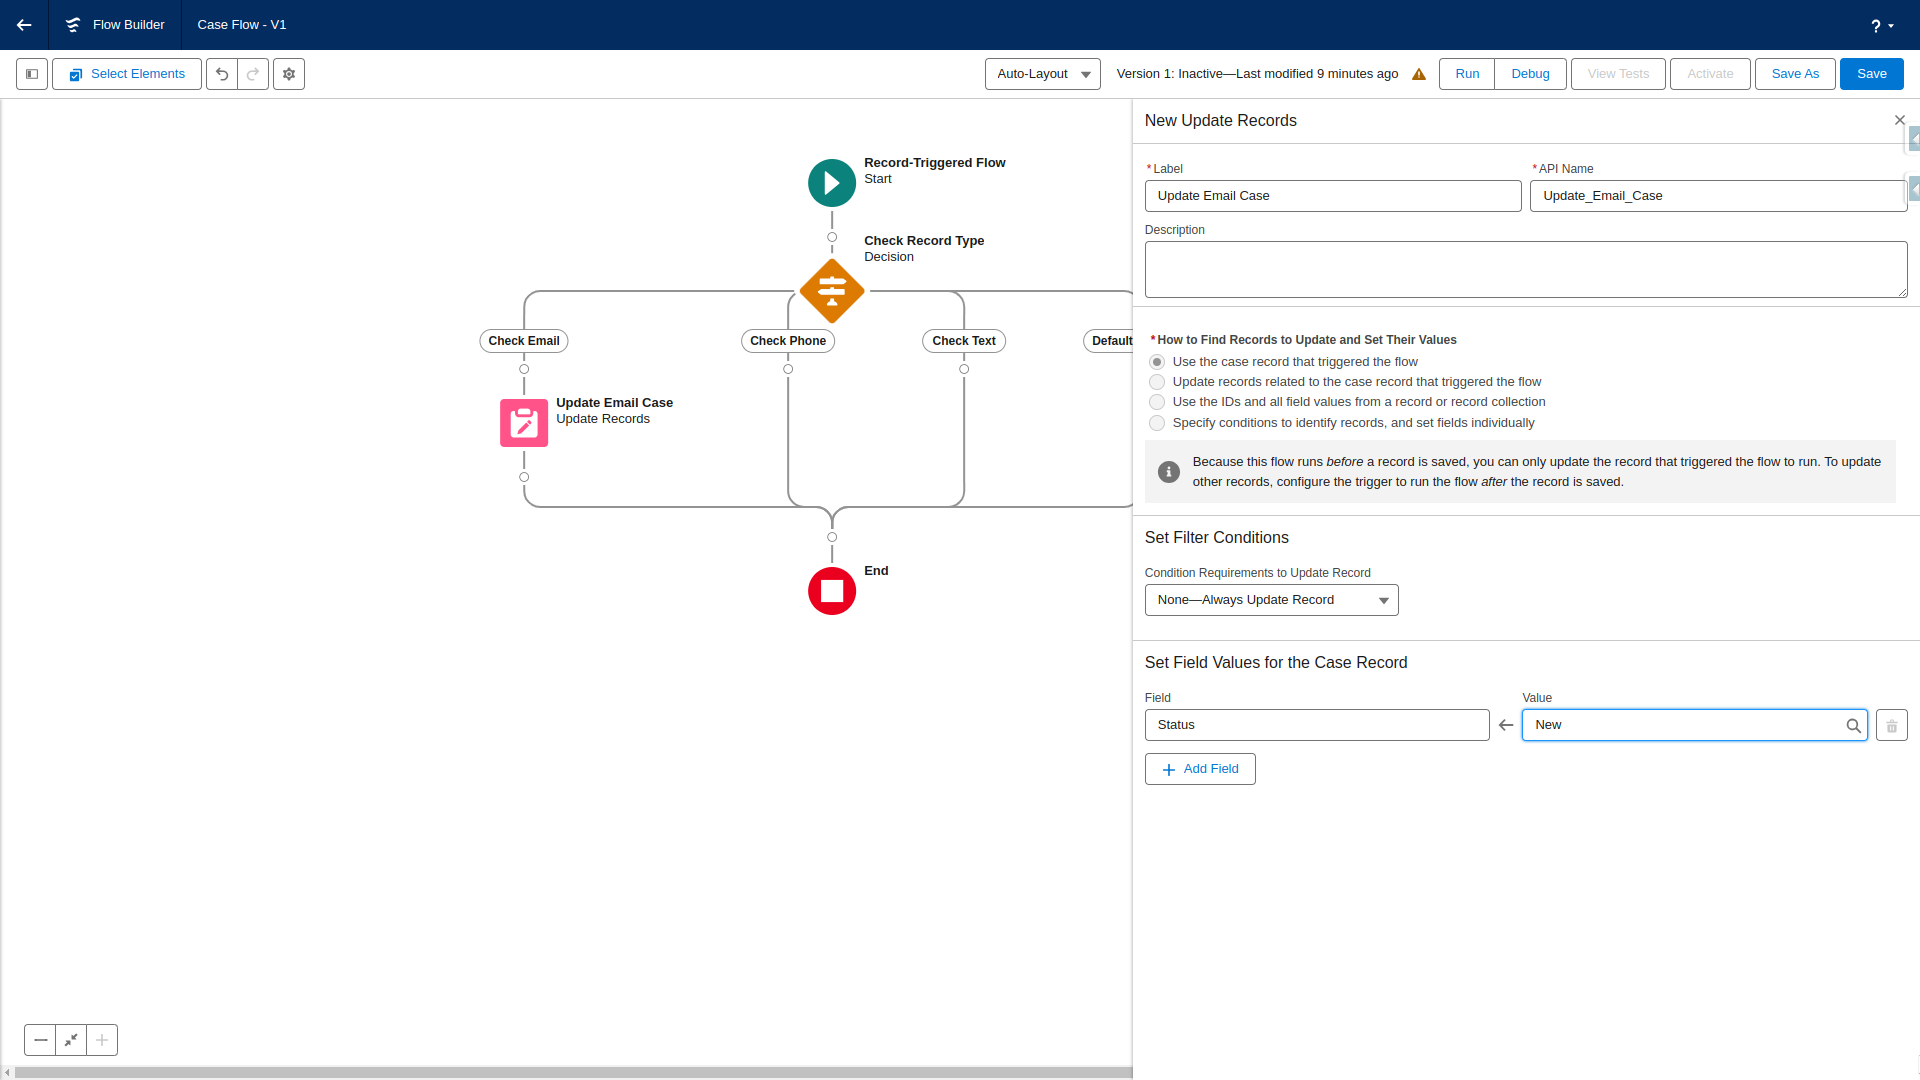
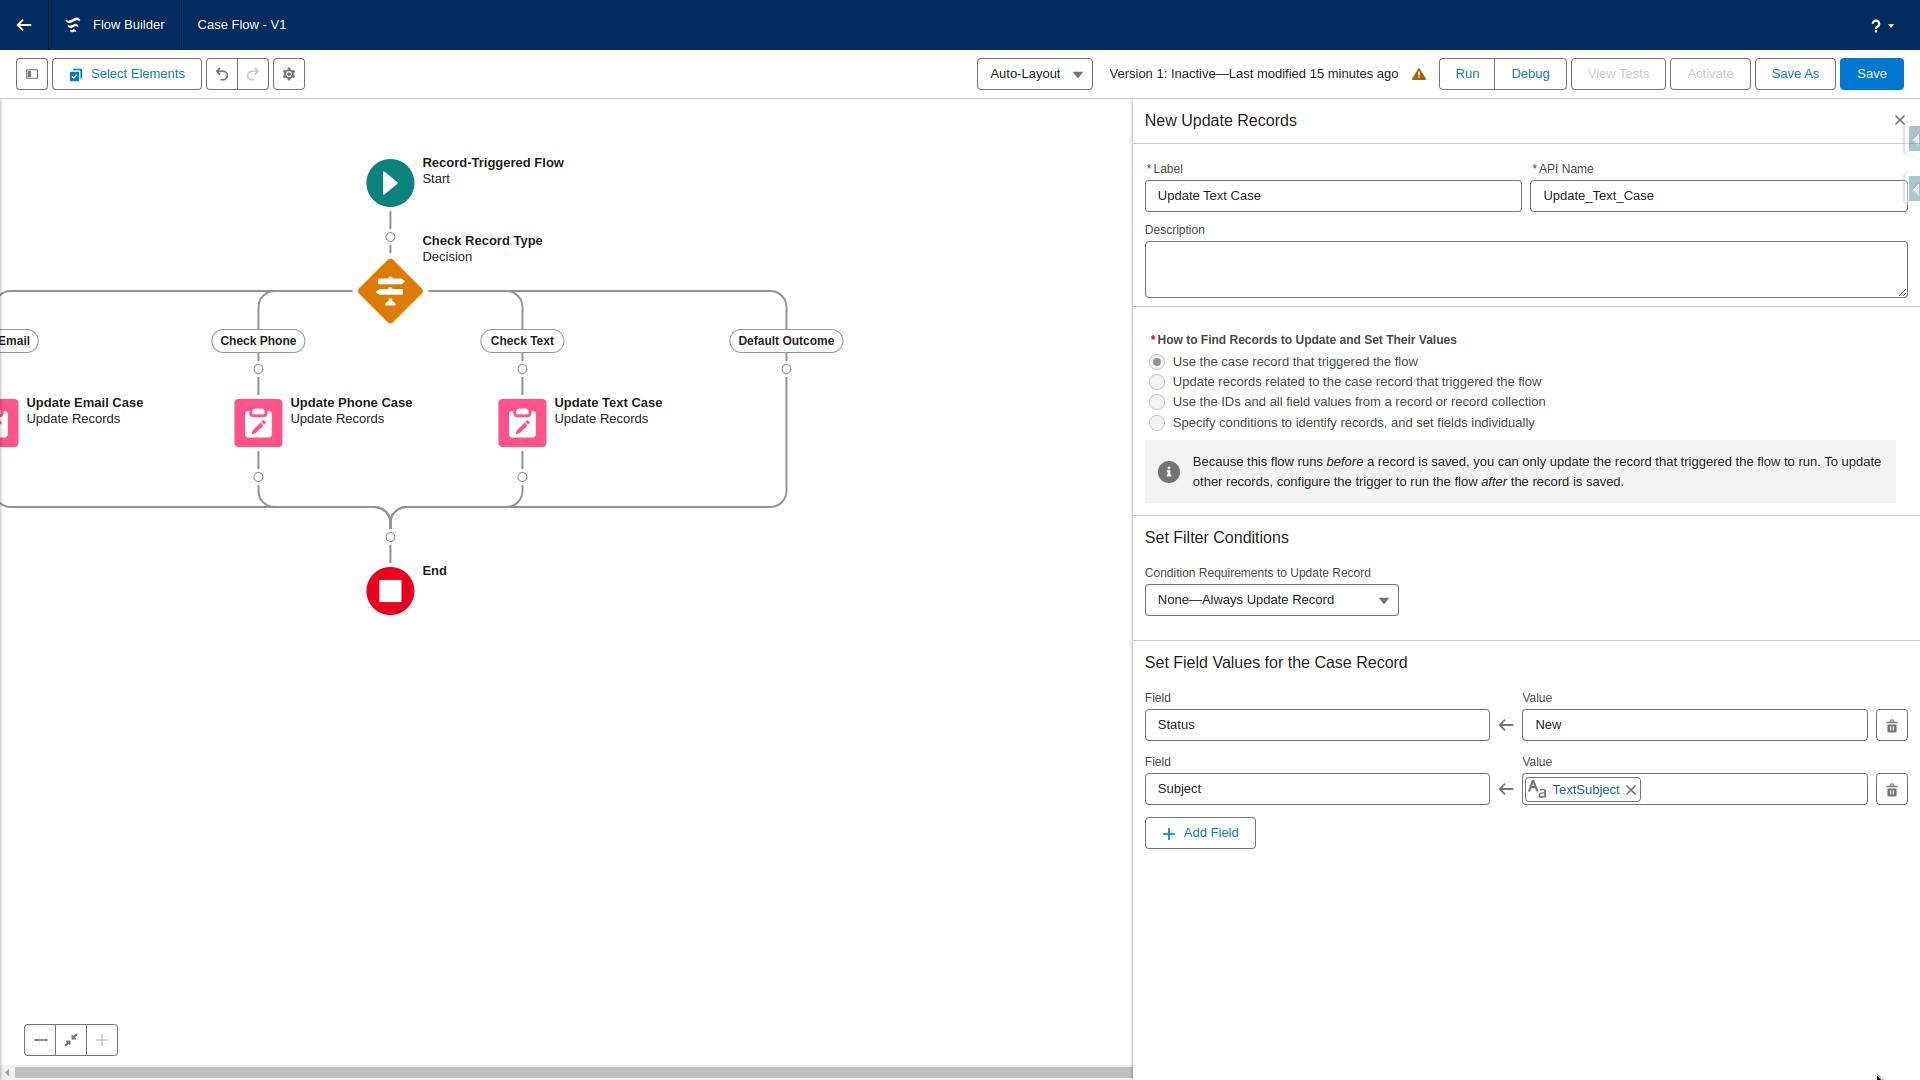
Then, we can modify the record triggered from the flow. We can add an Update Triggering Record element under the Check Email decision branch. Then:
- Give the element a unique name
- Set the status to
new - Map the subject.
To create a dynamic value like we did for process builder, we need to:
- Create a new resource
- Select
Formularesource type - Give the resource a name like
EmailSubject - Select the Data type of
Text - Add the formula to the box. You can use the
resourcebox to get the correct syntax for the contact's name.

We can then save the resource, then duplicate this for the phone and text branch.
You can see the complete flow in the screenshot below:
Potential Improvements
If you are looking for additional practice, try any of the following
- Give a default value if there is no contact related to the case
- Make one formula for all case types
- Only enter the flow when a record is created or the record type changes
Scenario 2 - Create a Related Record
Imagine a scenario where we need to create a related record when an opportunity reaches a certain stage. For example, upon moving an Opportunity to "Closed Won," we want to generate an invoice related to it.
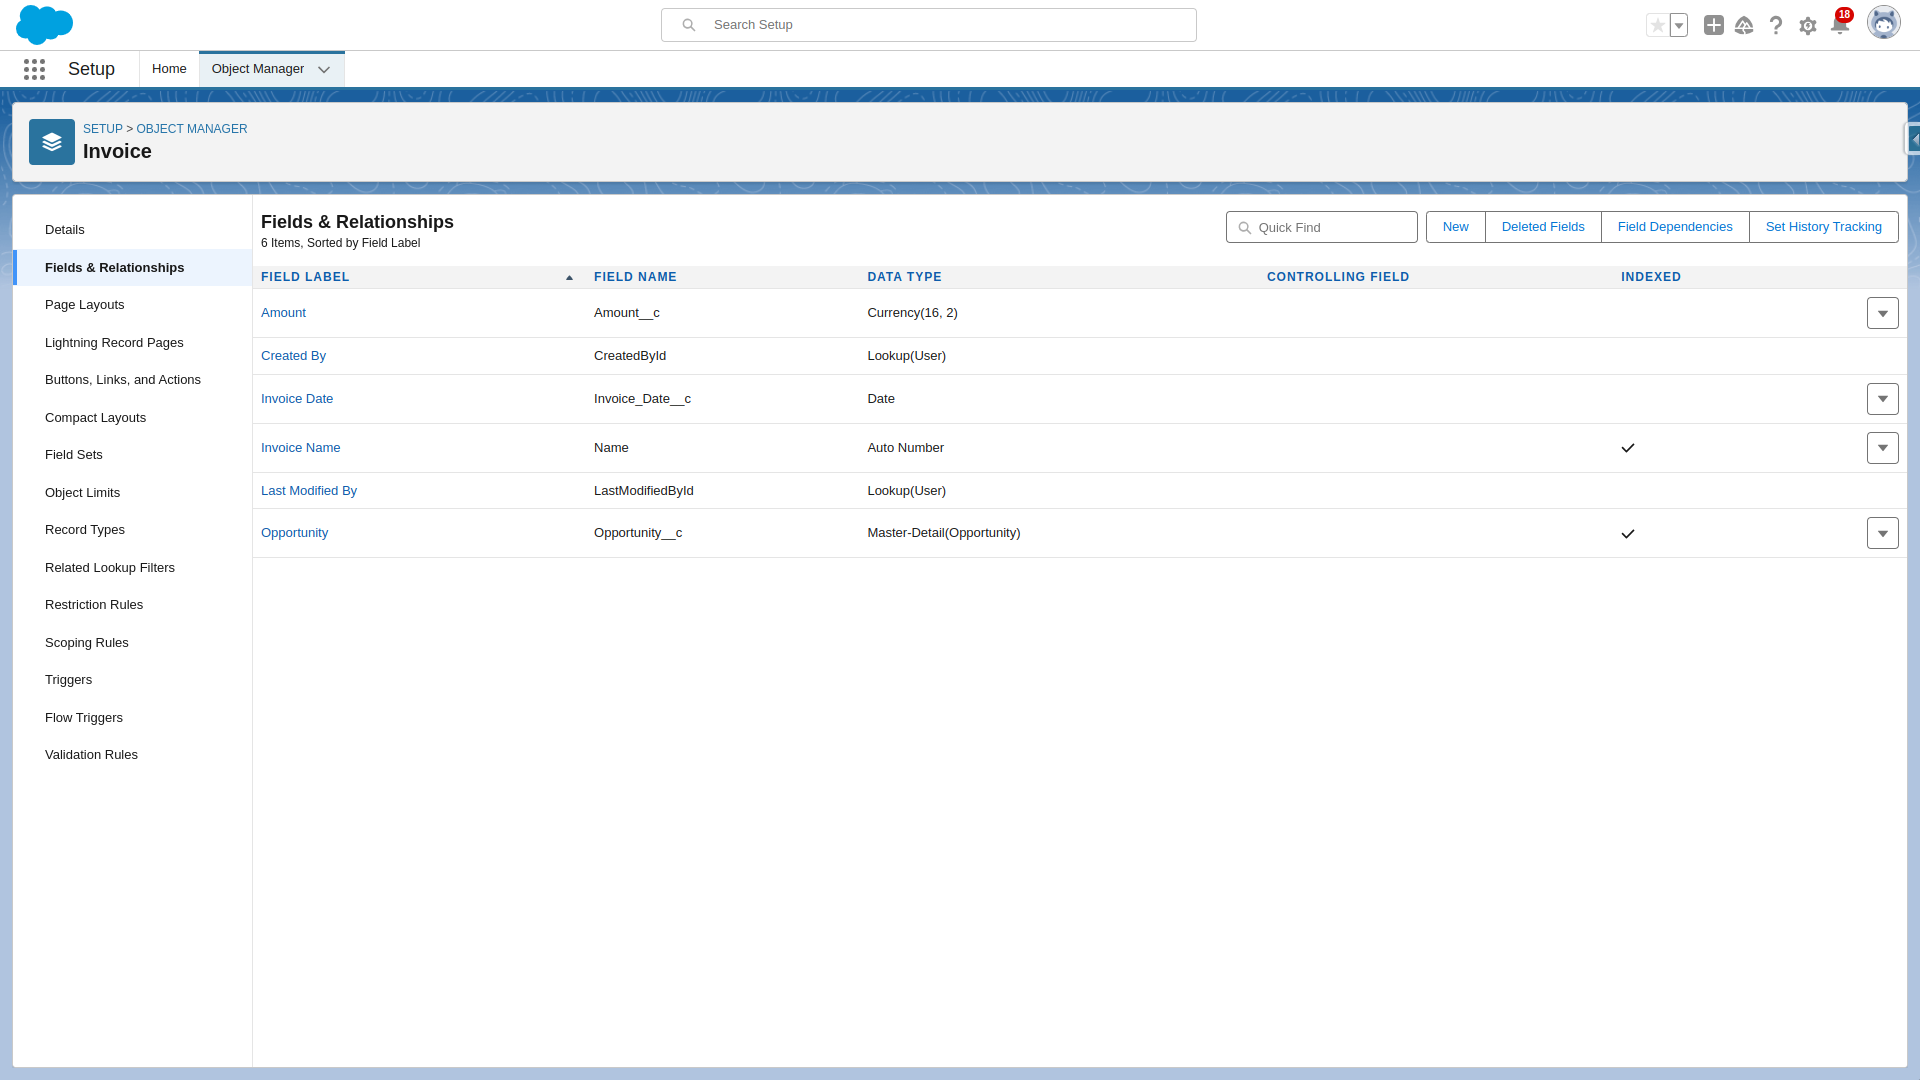
We need to use a custom invoice object to achieve this. You can see the custom invoice configuration here:
Implementation in Process Builder
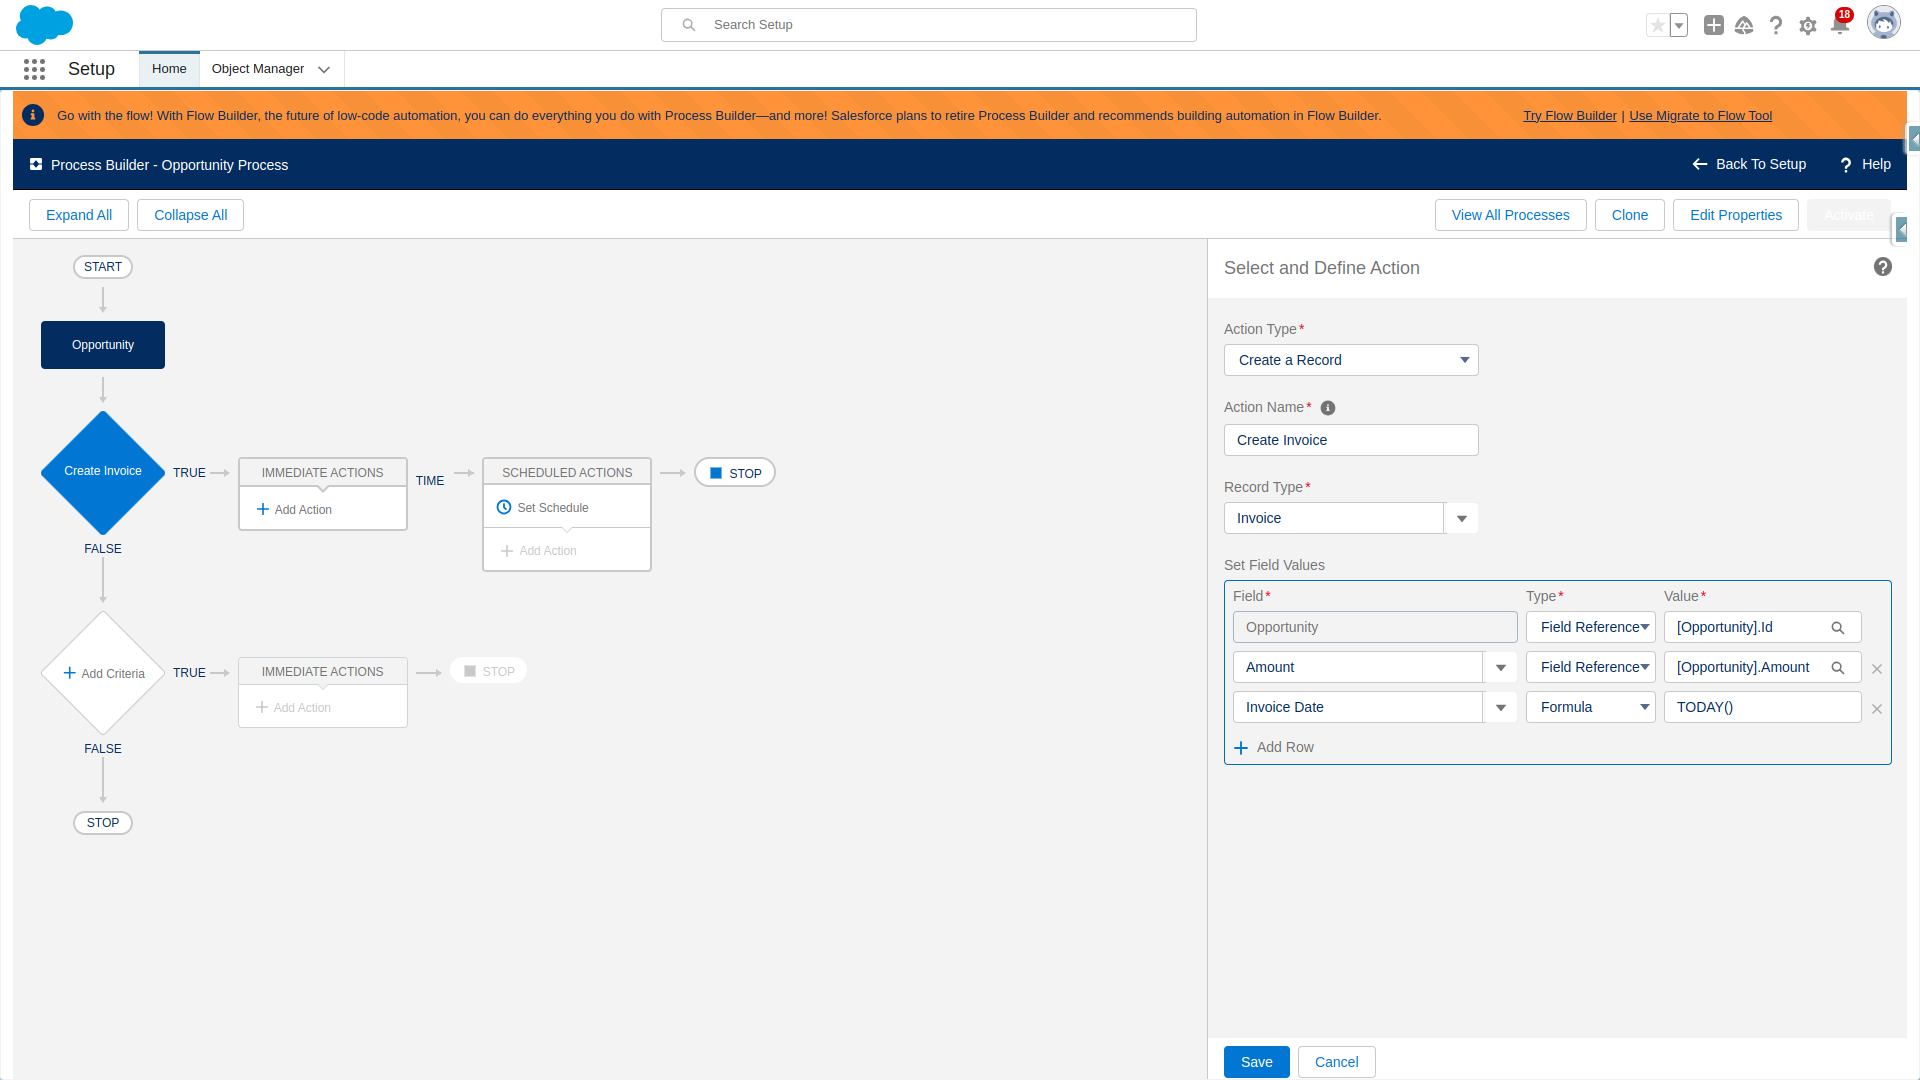
We can create a new Process, Opportuntiy Process, then::
- Make the process run when a record changes
- Set the object as
Opportunity - Start the process when a record is created or edited
- Add Execution criteria where:
- Opportunity Stage Name = Closed Won
- Set the execution when specified changes are made to the record
- Then, add an action
Create Record - Change to a type
Invoice - Map the fields accordingly
- Use a formula to map the invoice date as
TODAY()
Then, save and activate the process.
You can see the entire process here:
Implementing in Flow
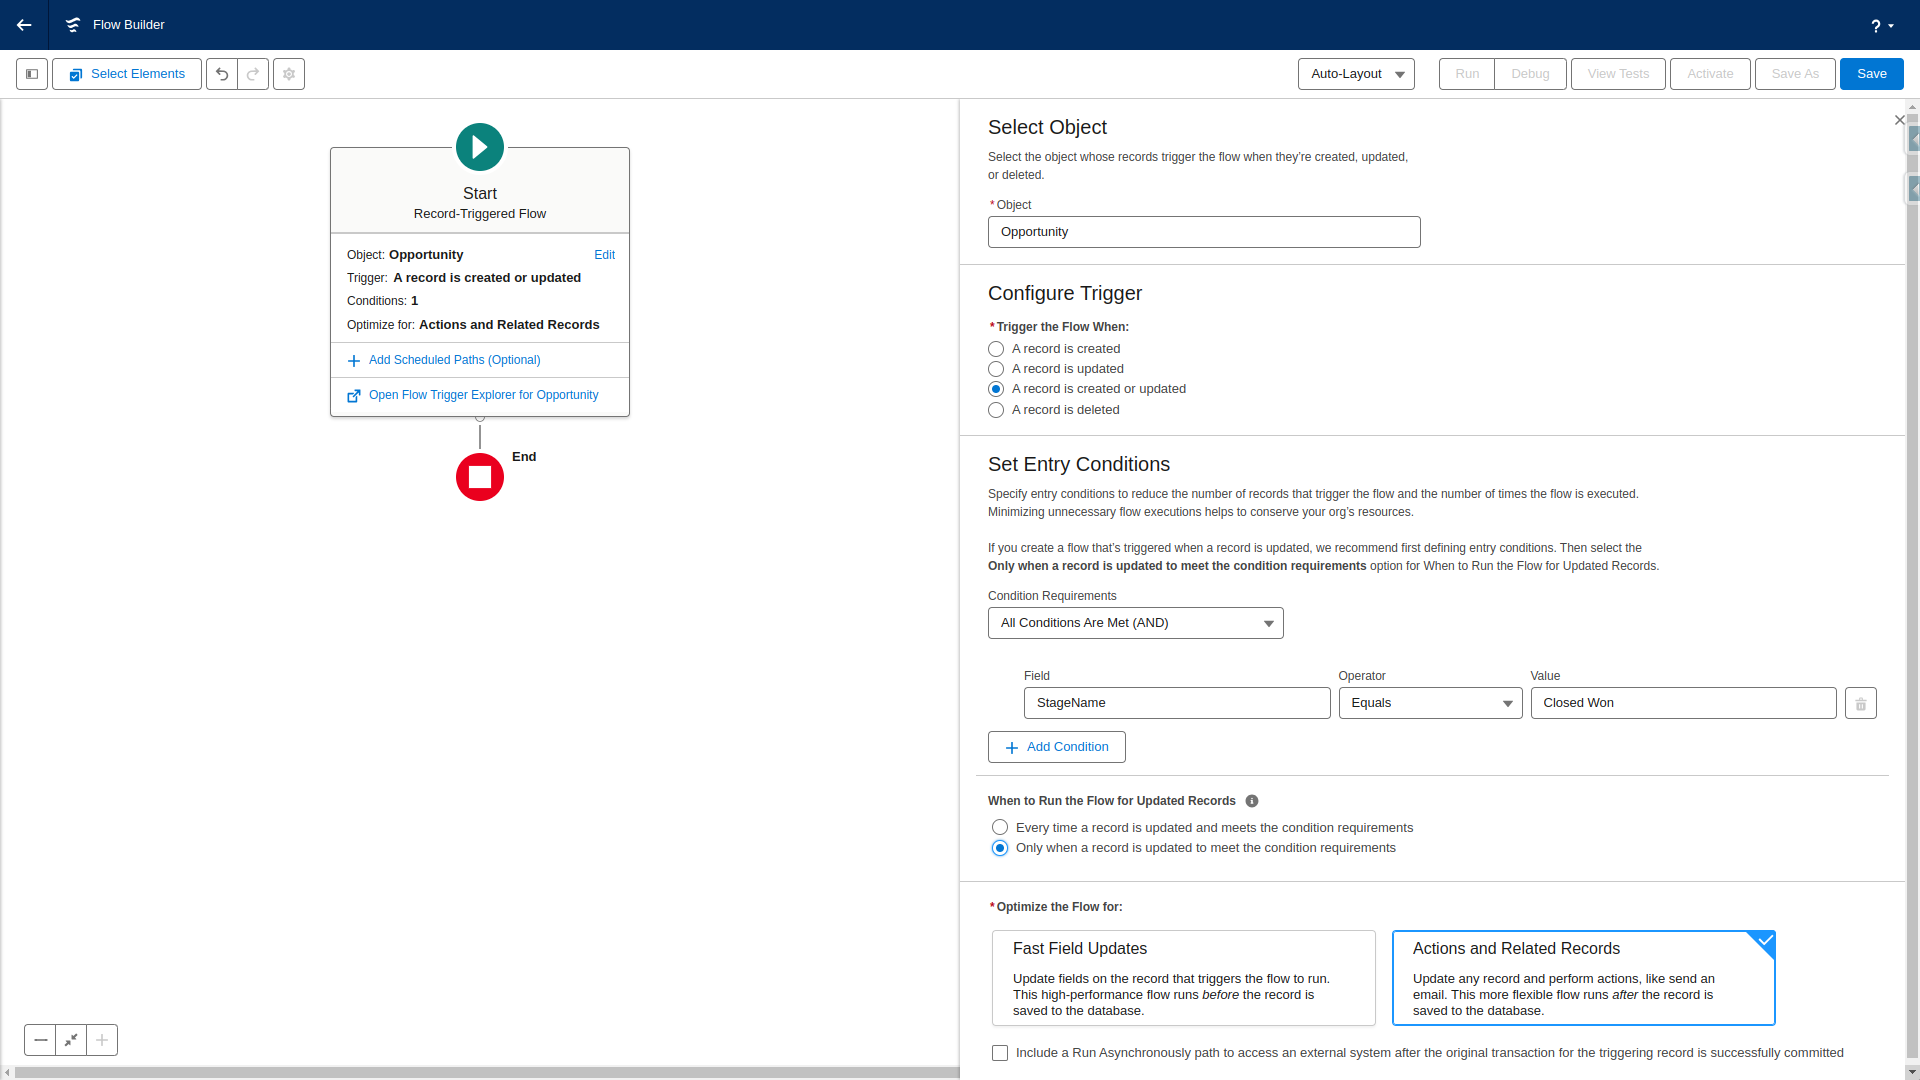
We can jump into flow builder
- Create a new record-triggered flow
- Selecting the opportunity object
- Trigger when
A record is created or updated - Set entry conditions for when the opportunity is closed won
- We can also Set this to run when
a record is updated to meet the criteria - Select optimization for - Actions and Related Records
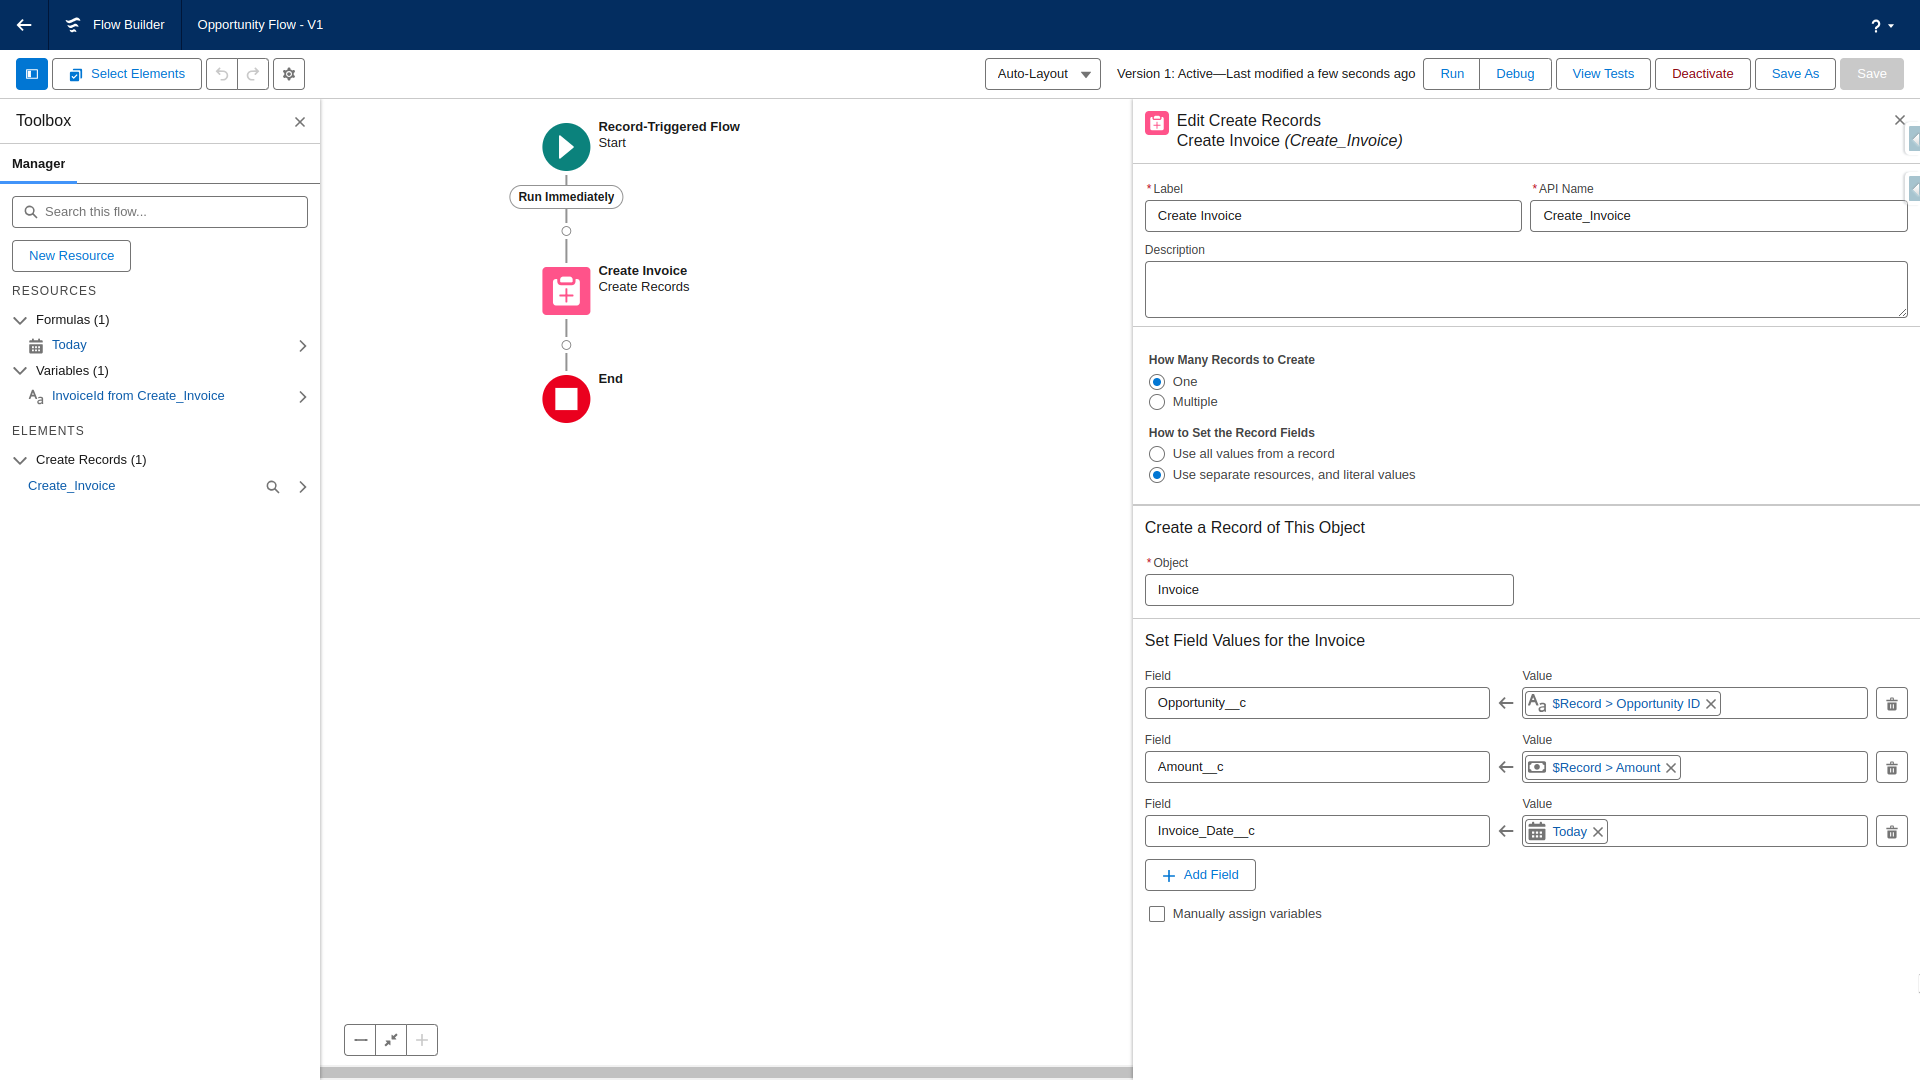
Now, we want to create a related record. We can do so by
- Add a
Create Recordselement - Give a descriptive name
- Mark as
Use seperate resources, and literal values- This allows us to build the mapping inside theCreate Recordelement - Set the object as
Invoice__C - Map fields with the appropriate values.
You can see the complete flow in the screenshot below:
Scenario 3 - Email Stakeholders on Significant Date Changes
Suppose you want to be notified when the close date of an opportunity is pushed back by 30 days or more.
Implementation in Process Builder
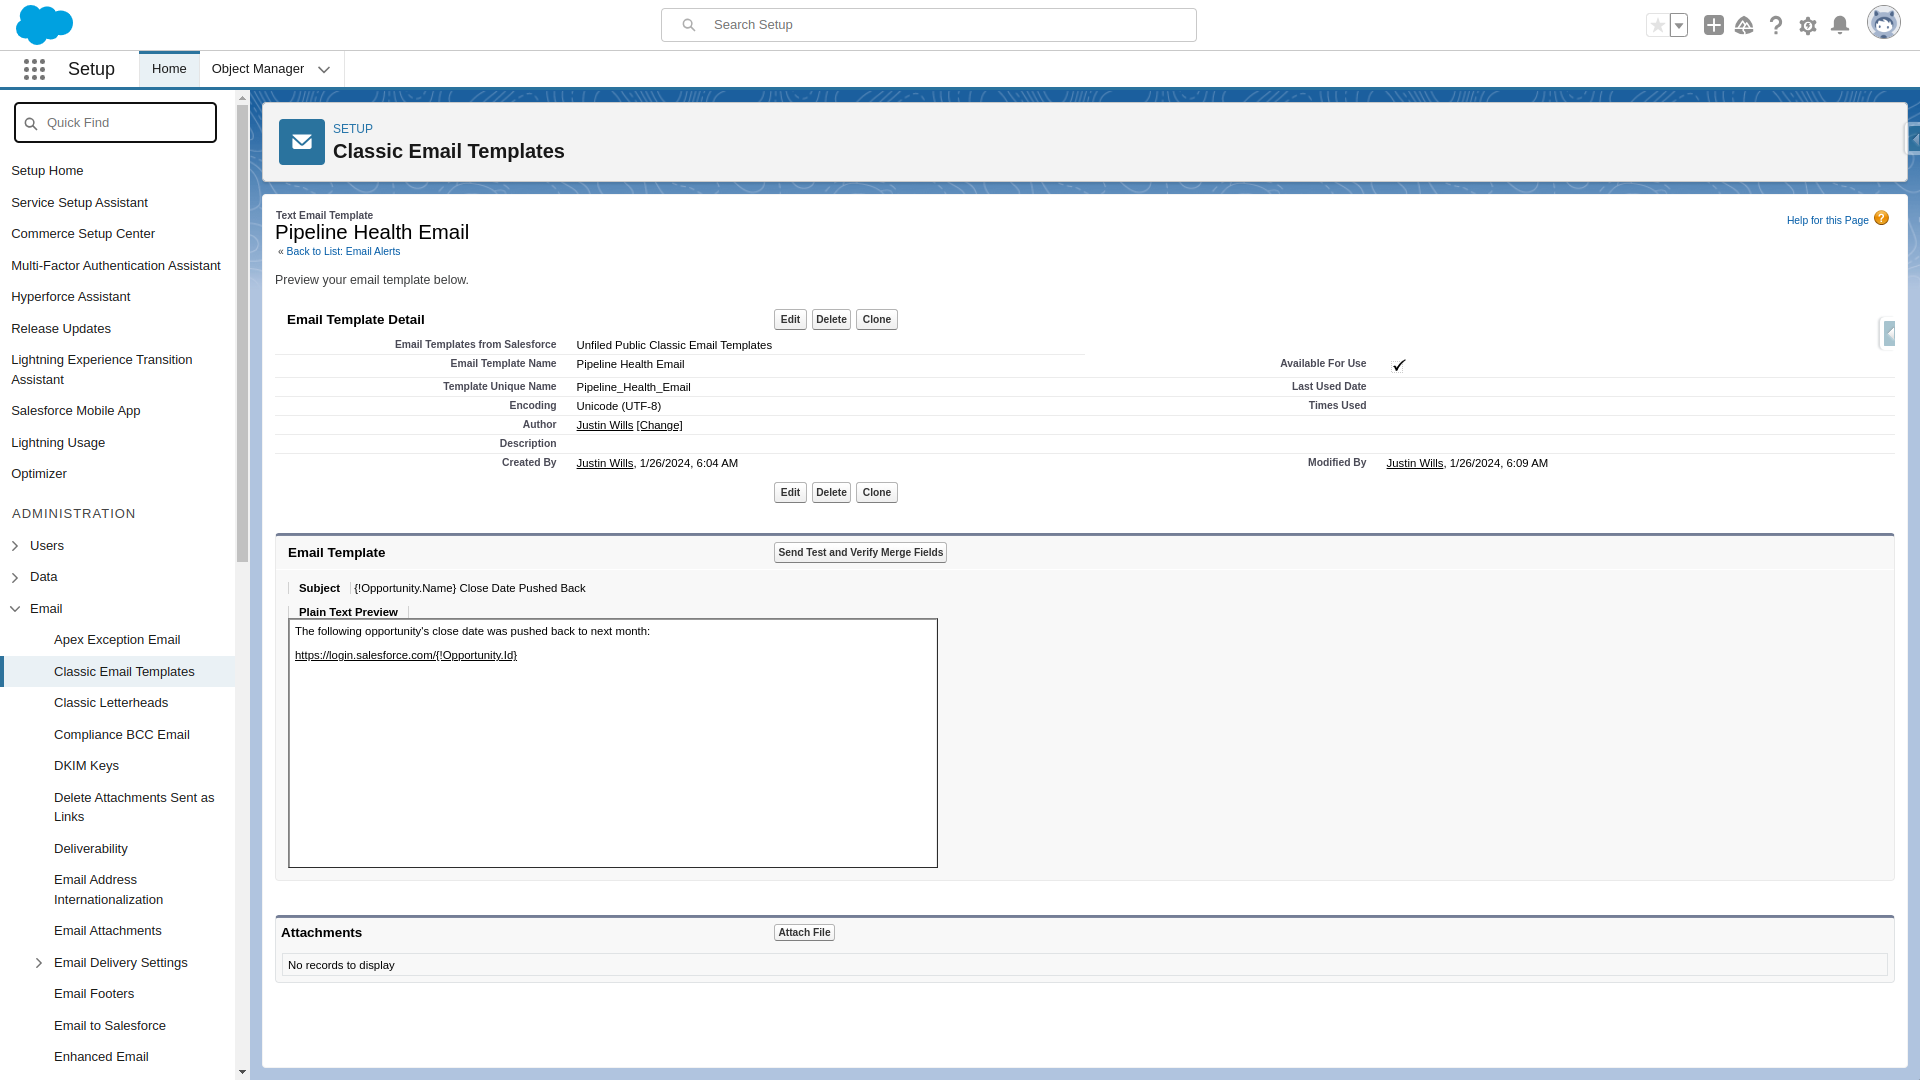
Before we can build this in process builder, we need to build an email alert to send an email. We can use this classic email template to send an email to a given recipient.
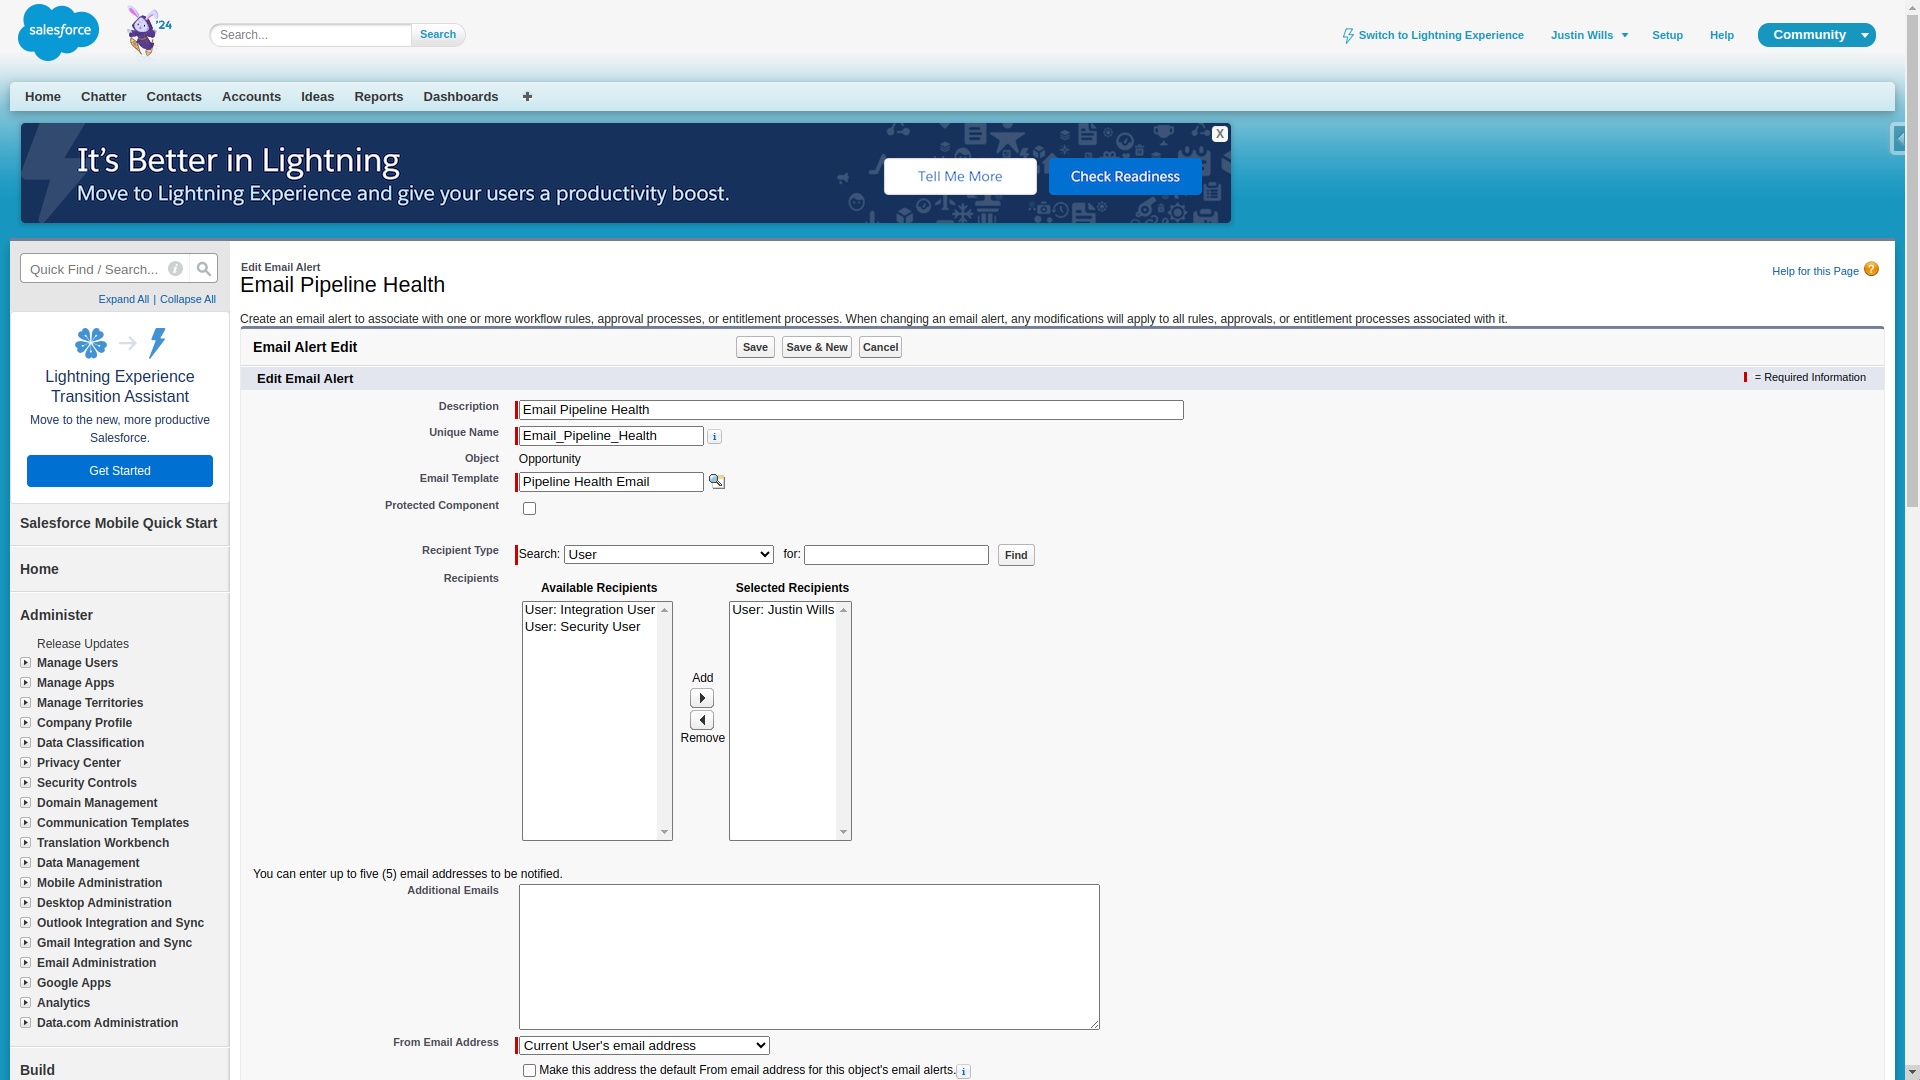
We can then build this email alert, where
- We use the previously created email template.
- And the recipient is the stakeholder.
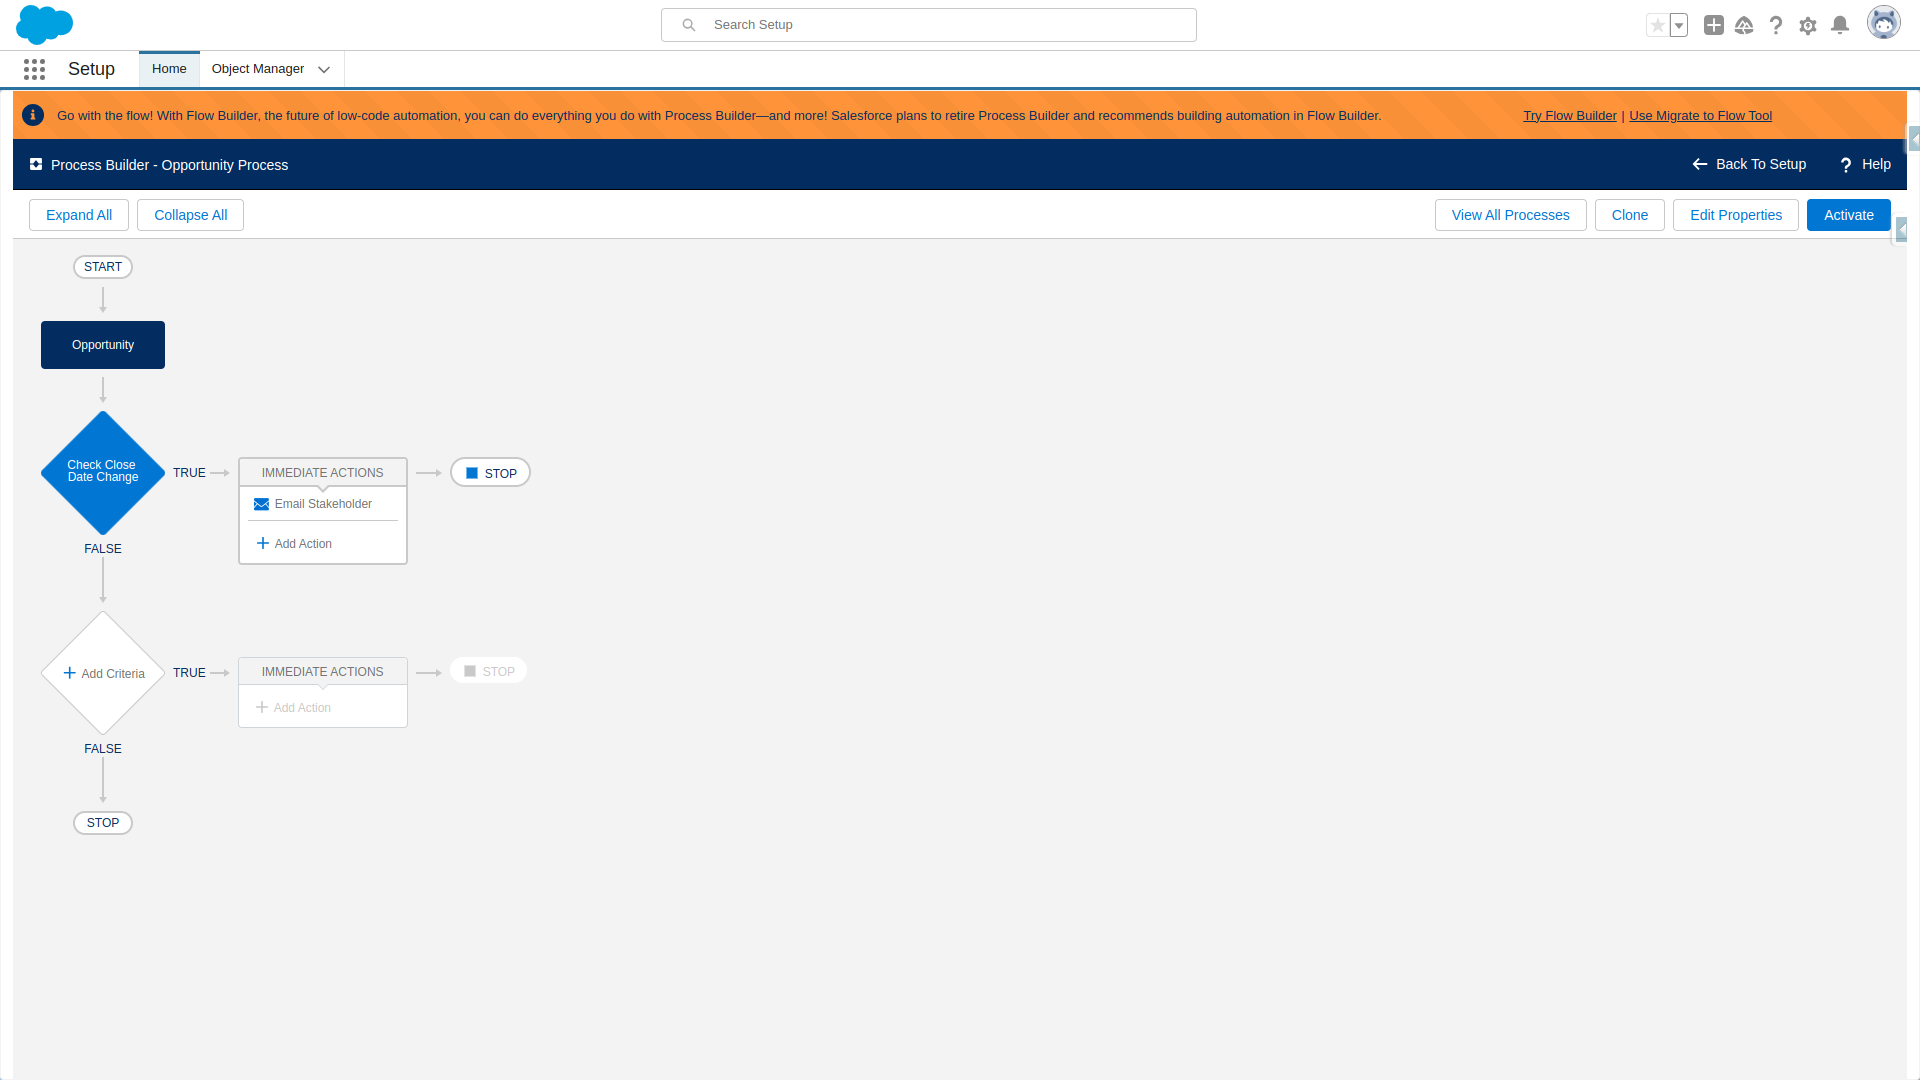
From here, we can:
- Create a new process
- Select the opportunity object
- Run when the record is created or edited
- Add a Criteria node
- Use the following formula to check if the close date has changed, and has been moved back 30 days.
- Add an email alert, that uses the previously created email alert.
- Save and activate the PB
You can see the entire process here:
Implementing in Flow
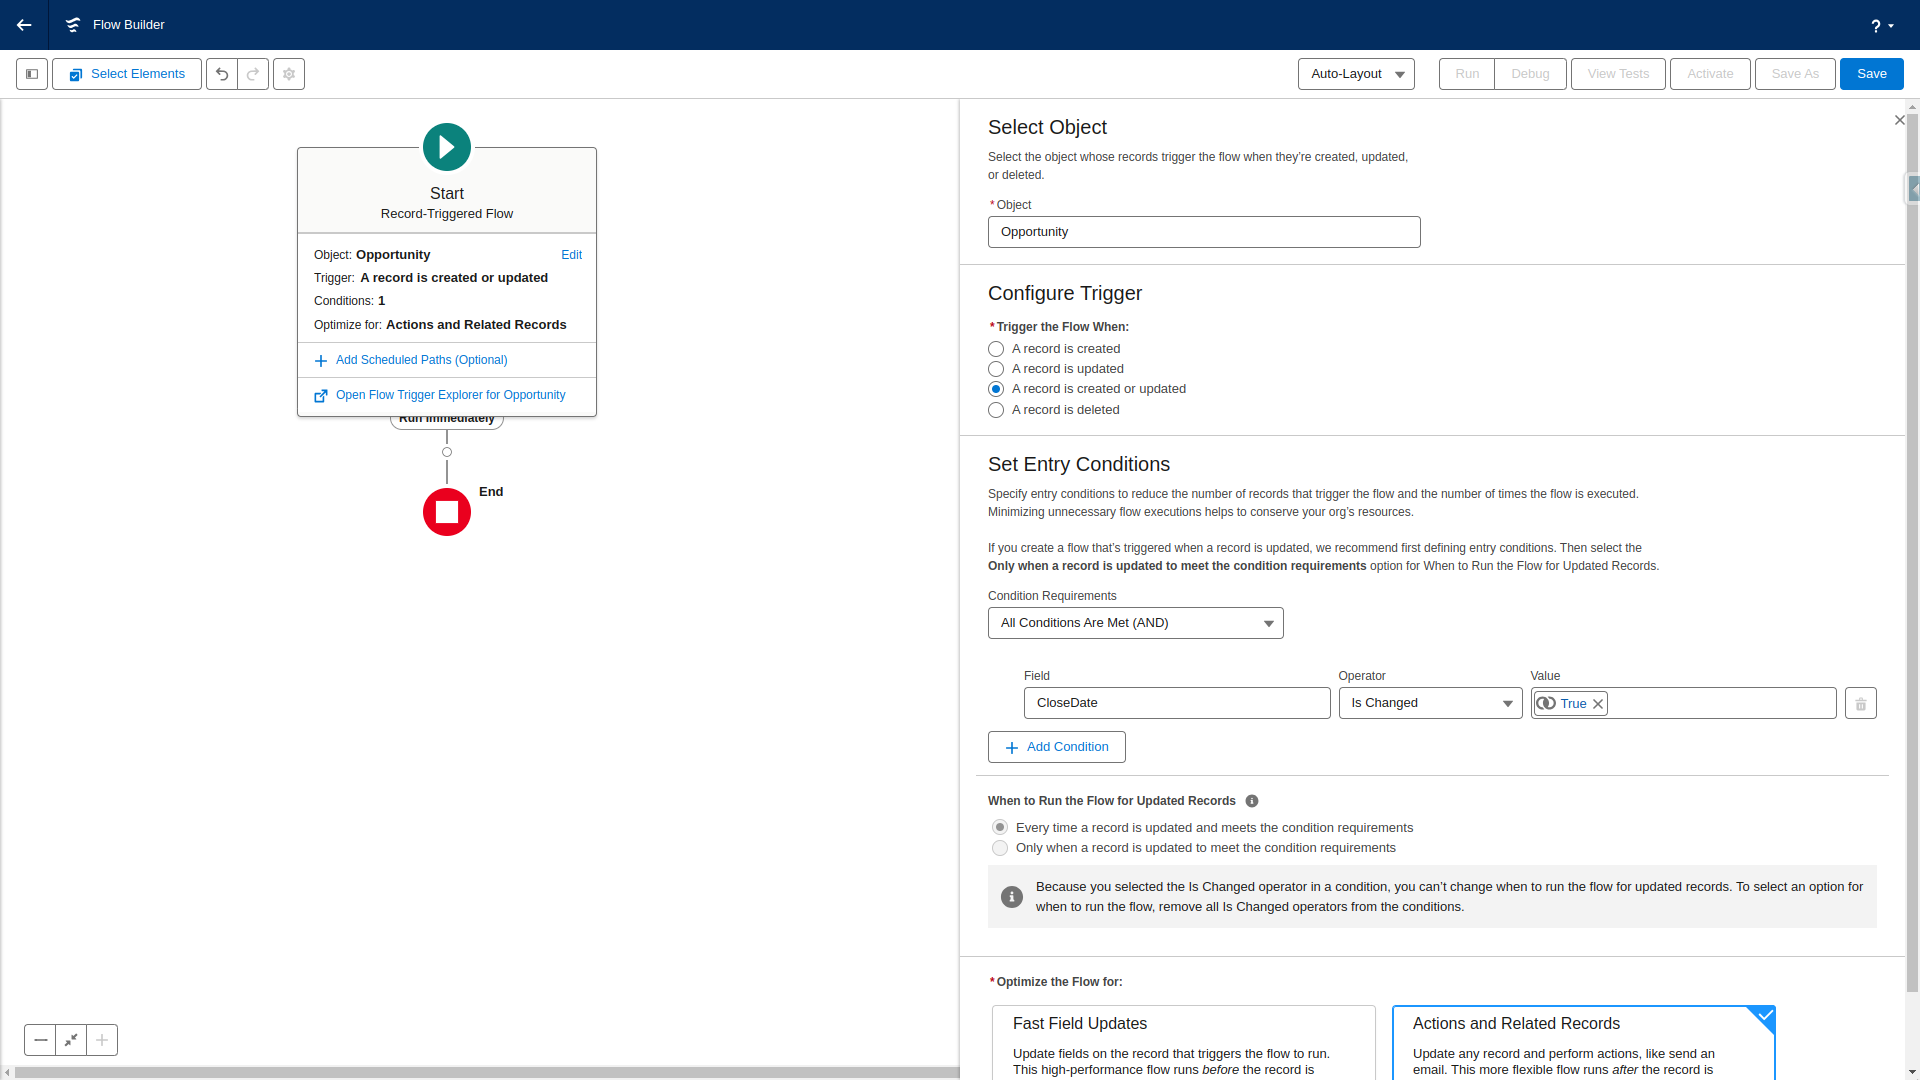
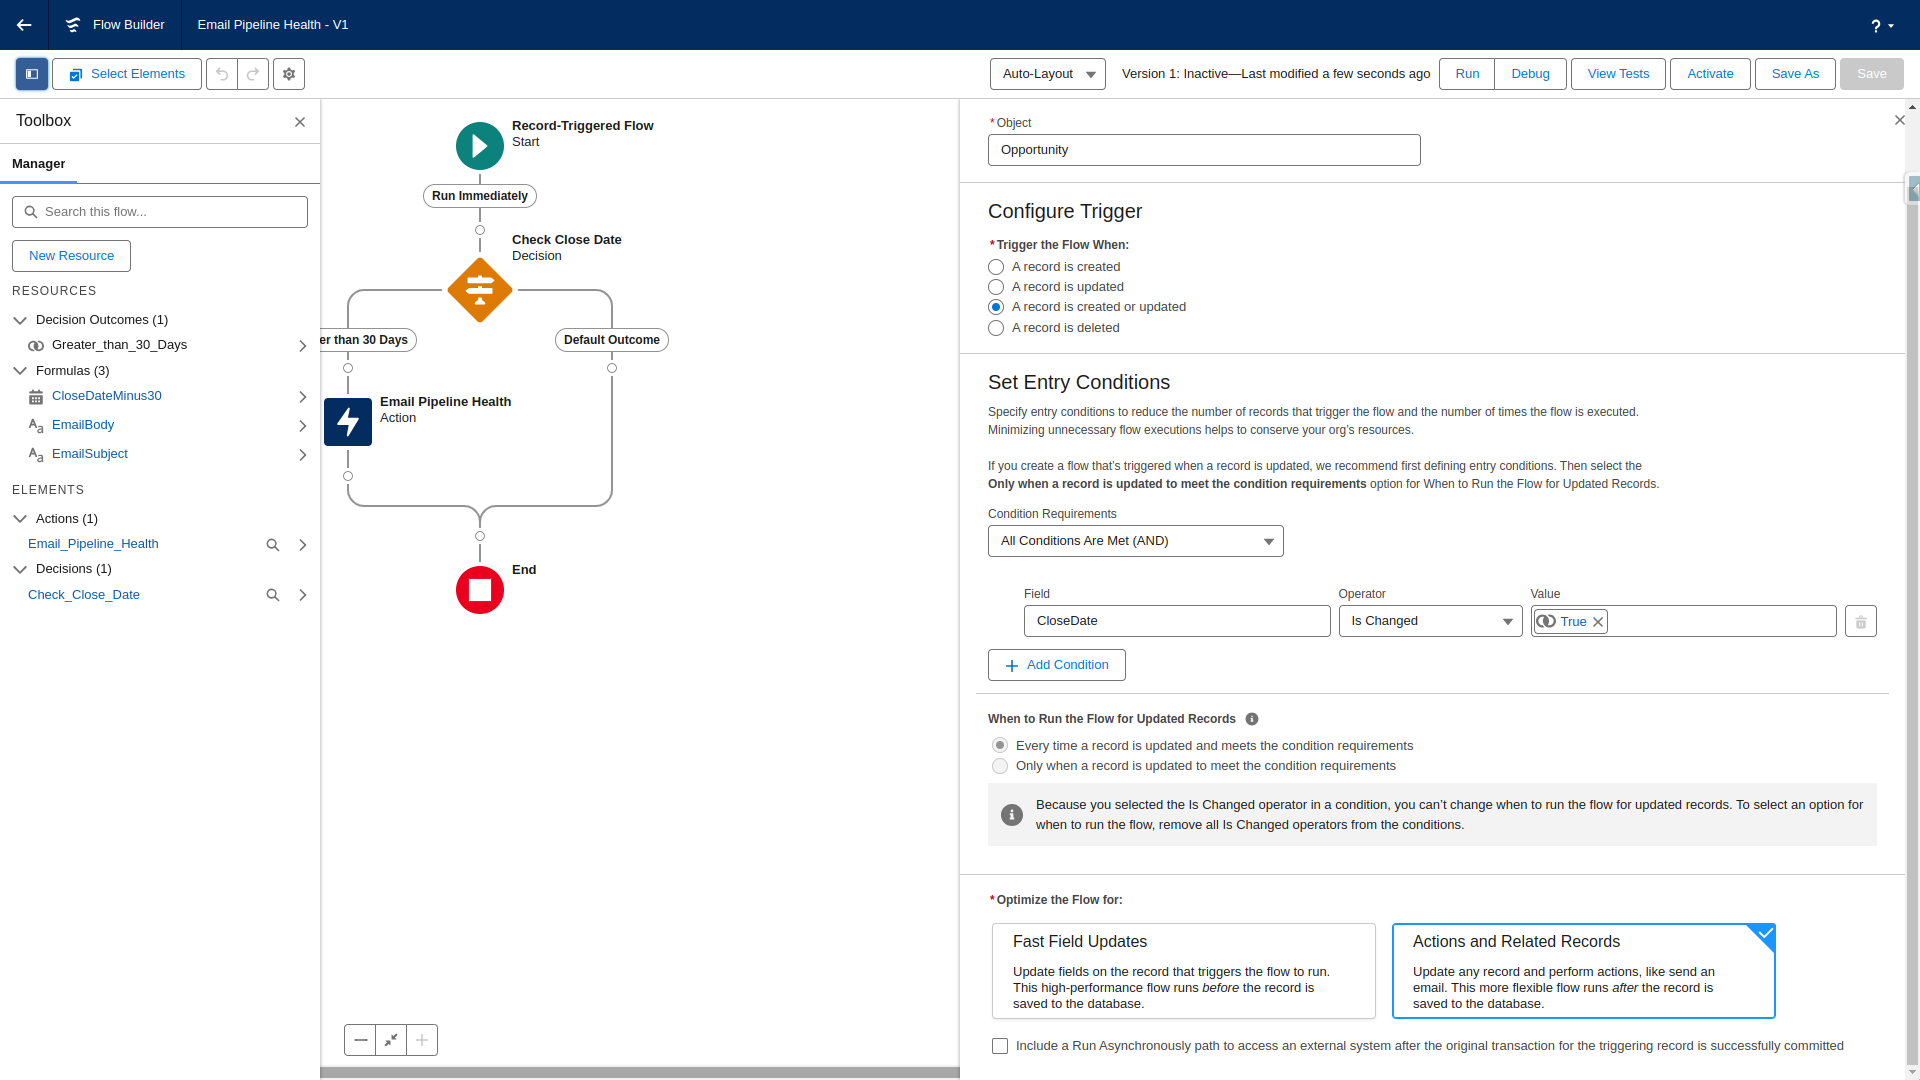
Inside of flow builder we can:
- Select a record-triggered flow
- Set the object as
Opportunity - Make the flow run when a record is
Created or updated - Set the entry conditions as the close date is changed = true
From here, we can add a decision element and:
- Give the element a name
- Make an outcome
Greater than 30 days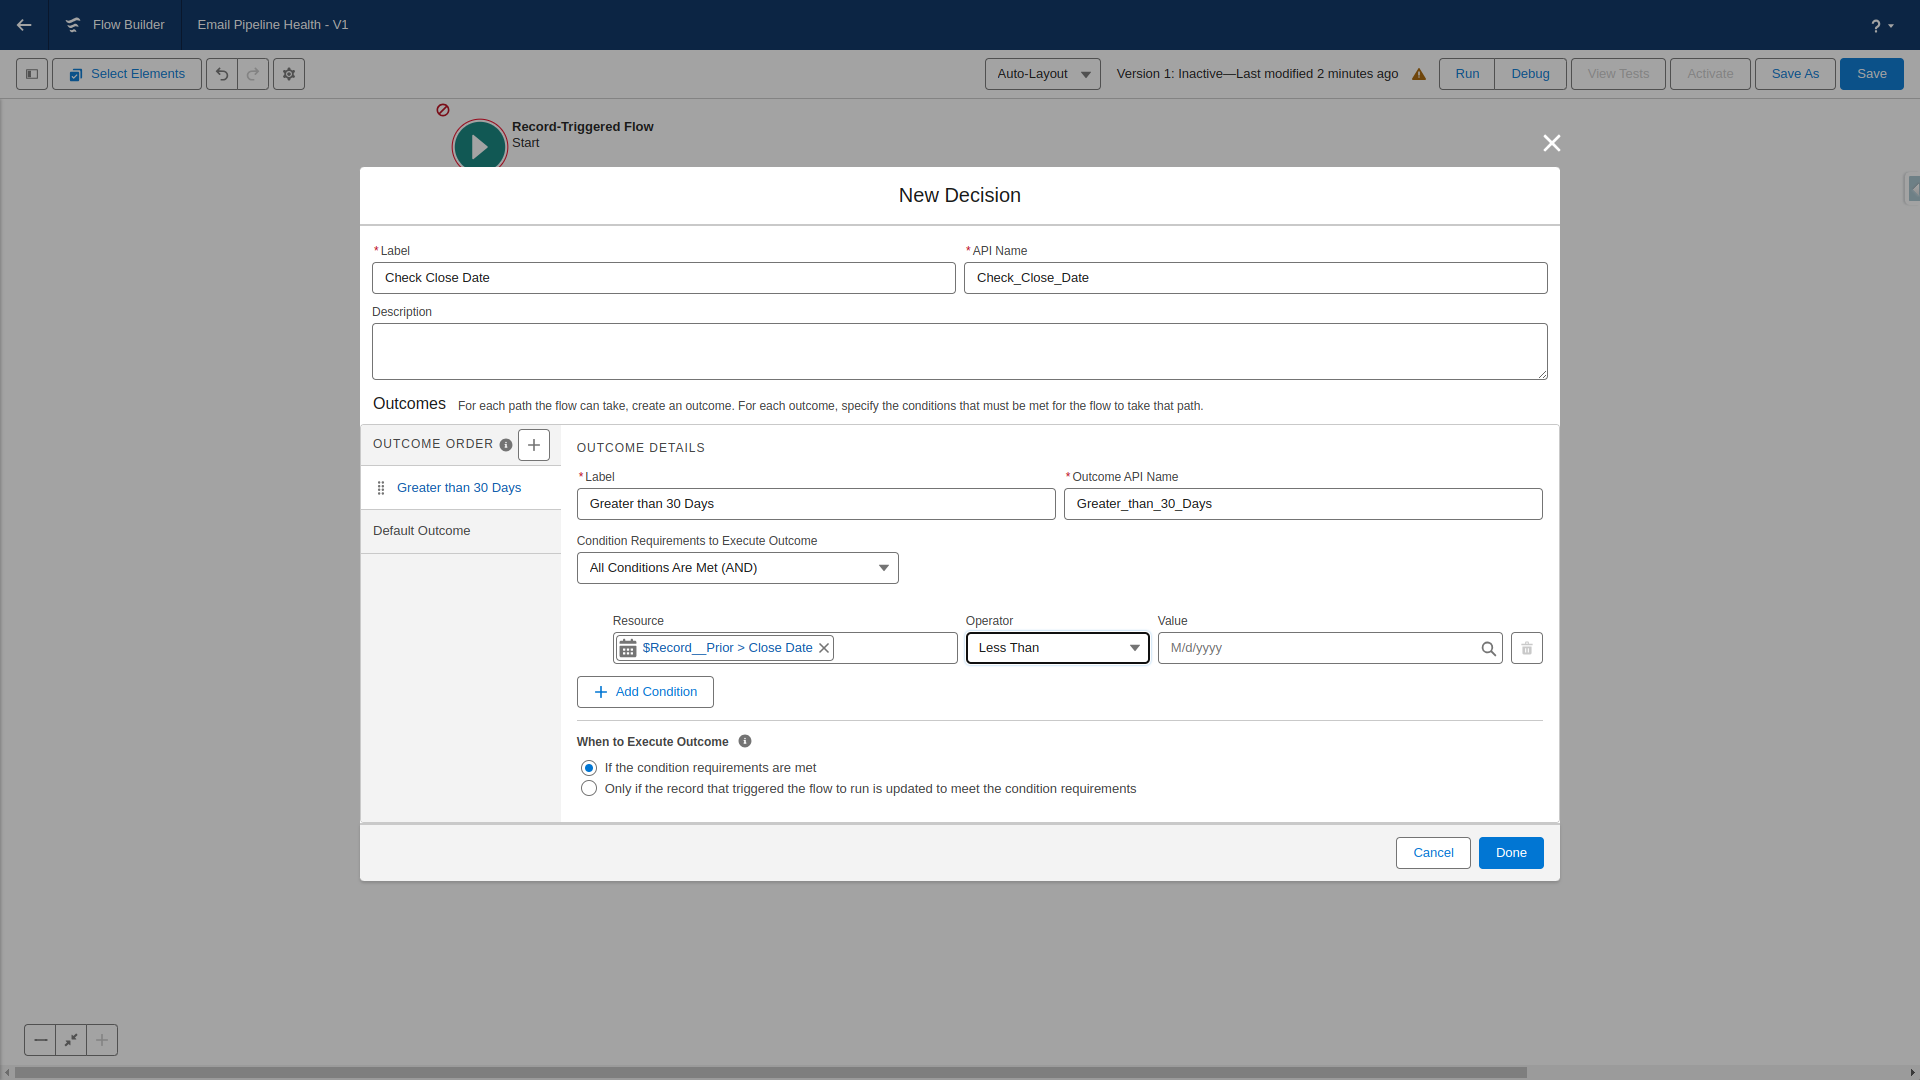
- We want to compare the old close date to the new close date.
- We can do so by using the close date from before the record was saved to the database by using the
$Record_Priorvariable. - We then want to use the less than operator.
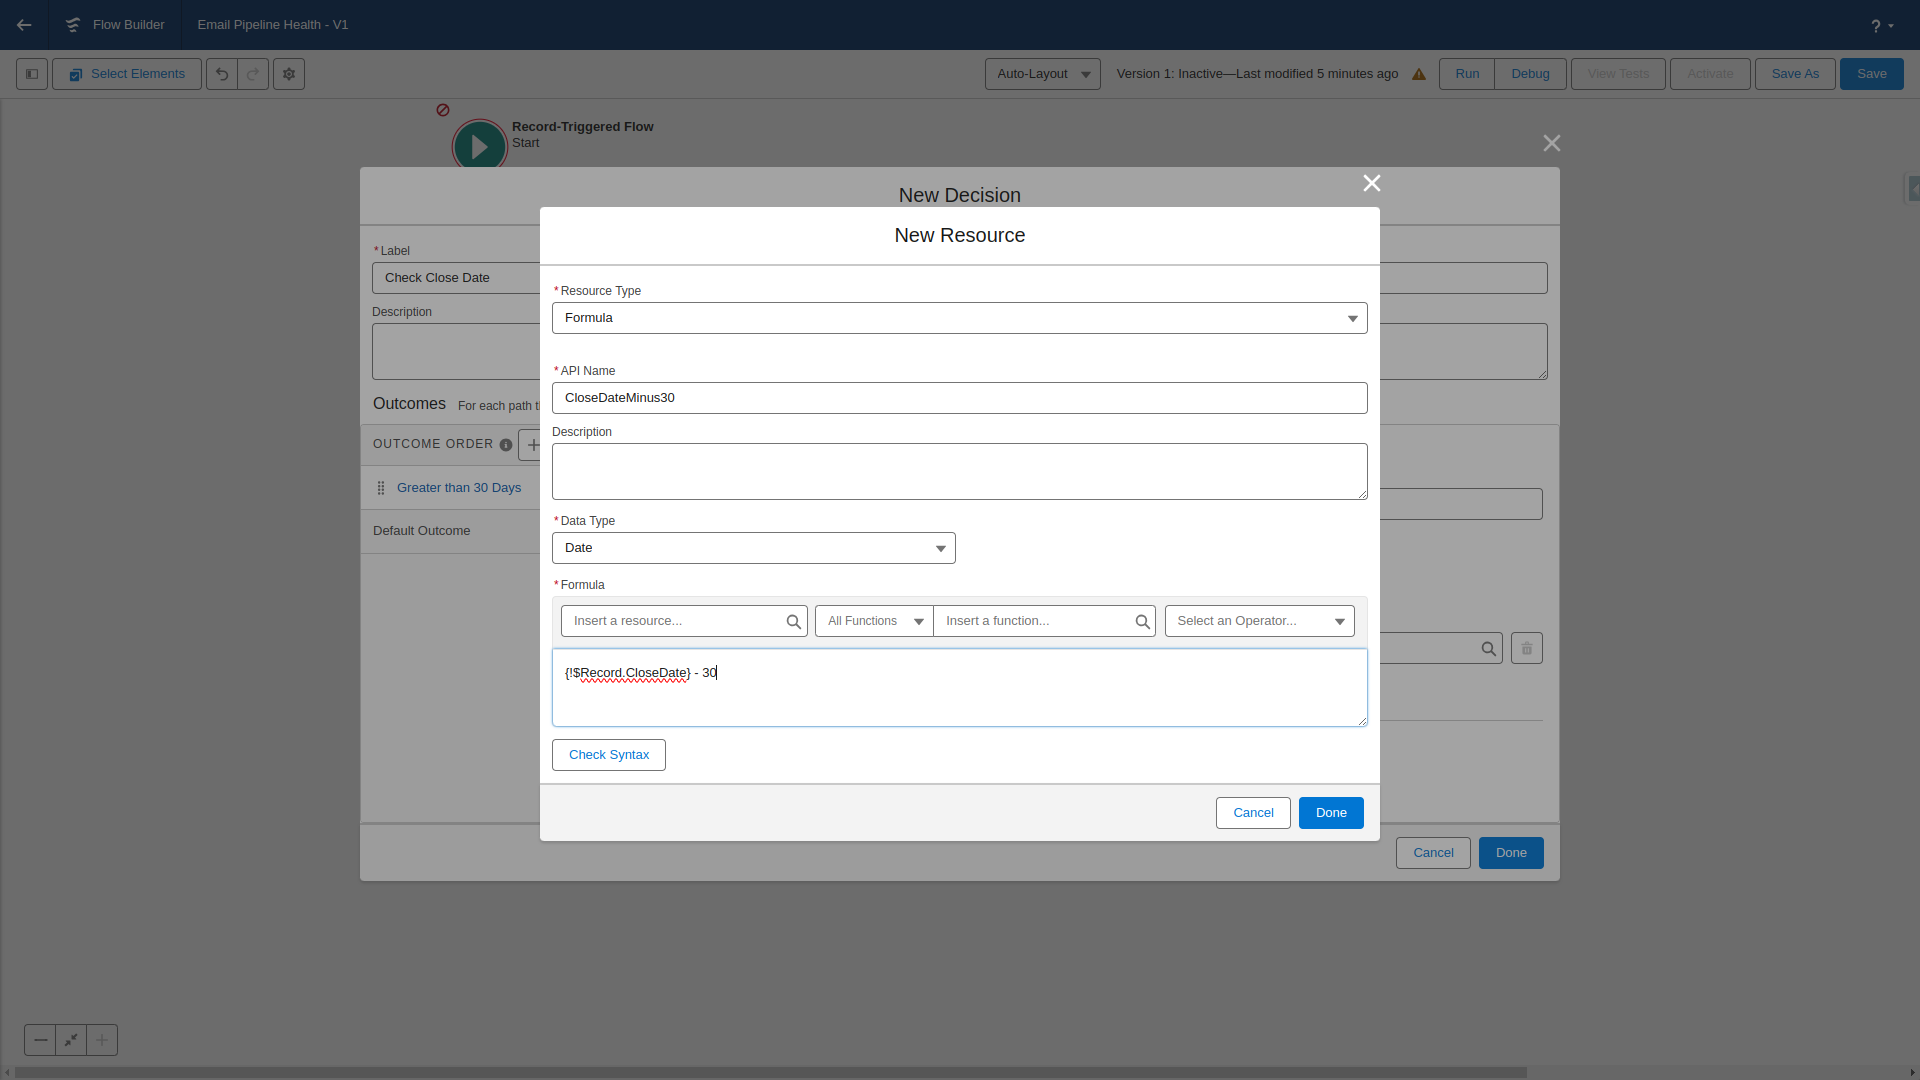
- And compare this to a new formula resource.
- We can get the desired calculation by subtracting 30 days from the new close date.
We can then send an email to the stakeholder.
While we can use the email alert that was created for the process builder, we can also use the Send Email action to avoid email alerts.
Create a new Send Email element, then:
- Give the element a name
- Include a body
- We can use a new formula resource to make the email body tailored to each record.
- We can use the following formula, which will also include a dynamic link back to the original record.
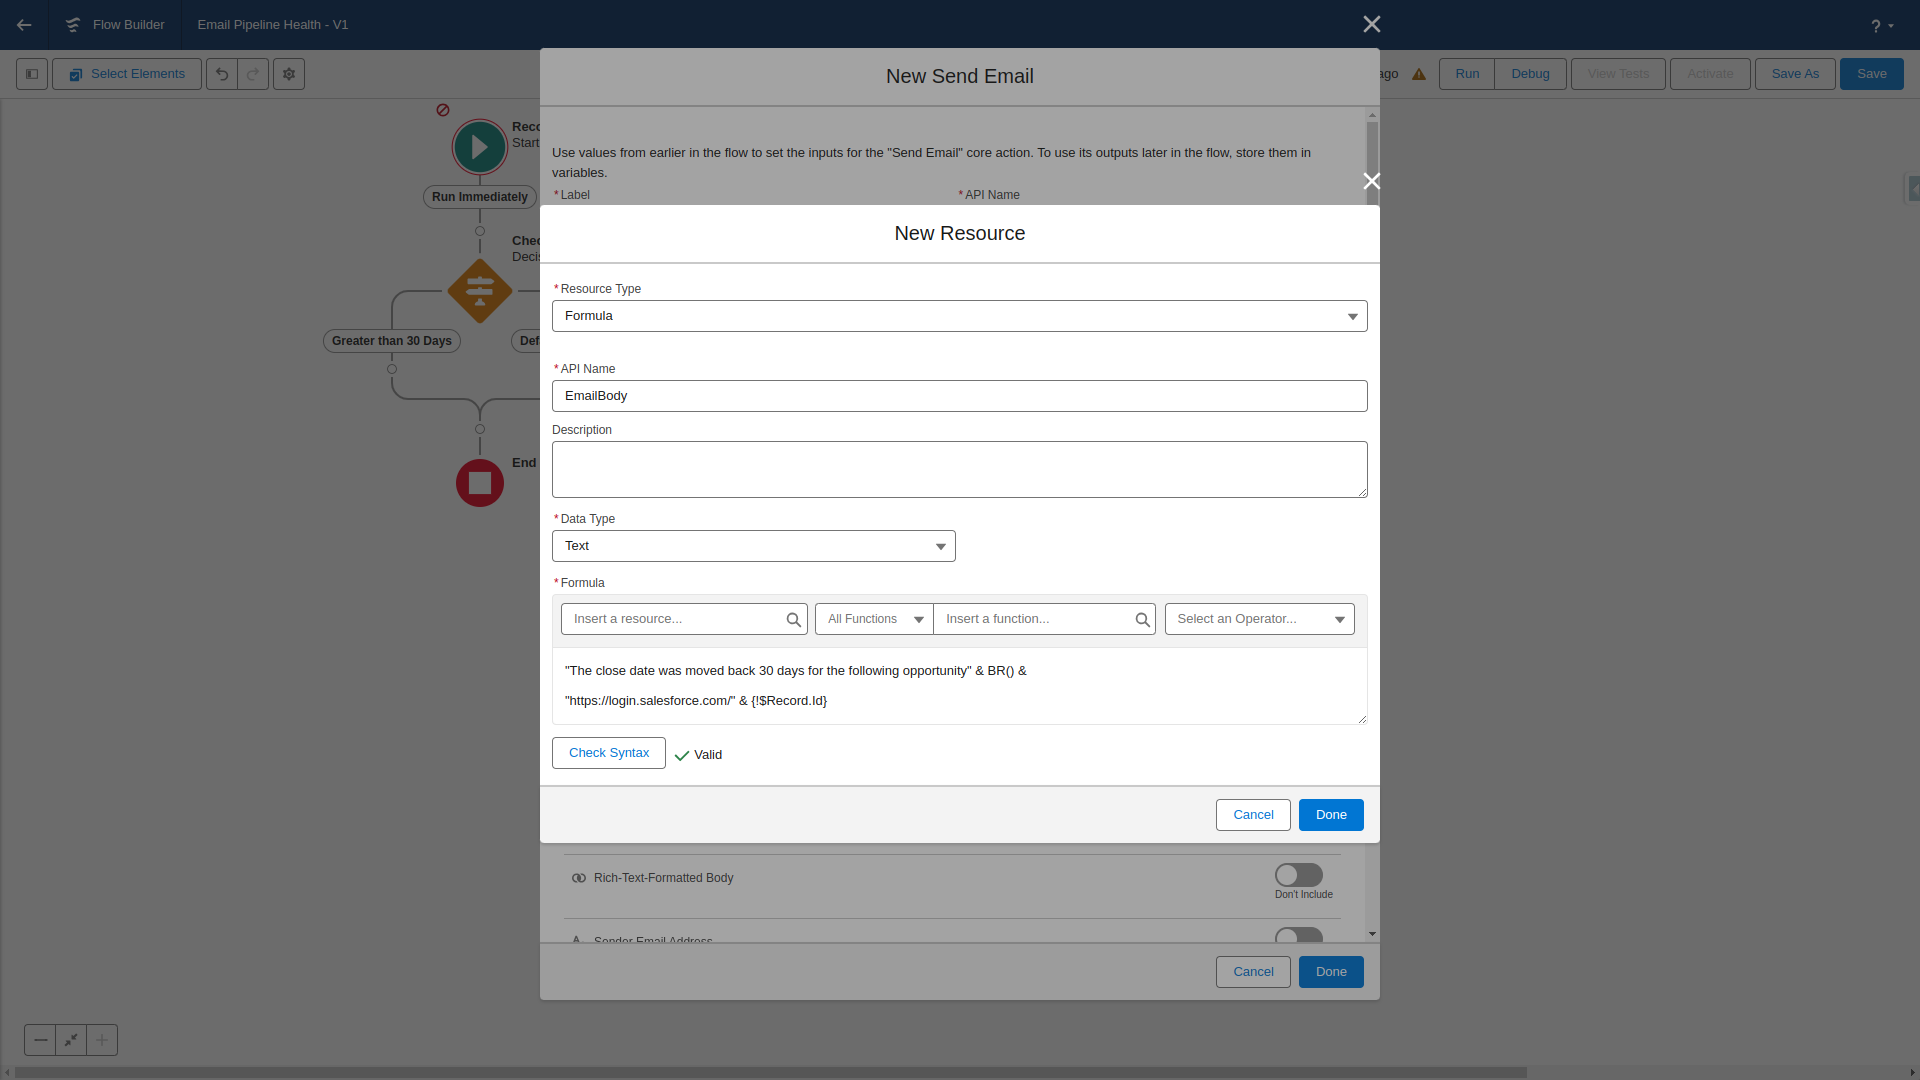
- Then, we can add a recipient, like the stakeholder.
- We can add a subject like we had for the body. The subject will include the opportunity's name
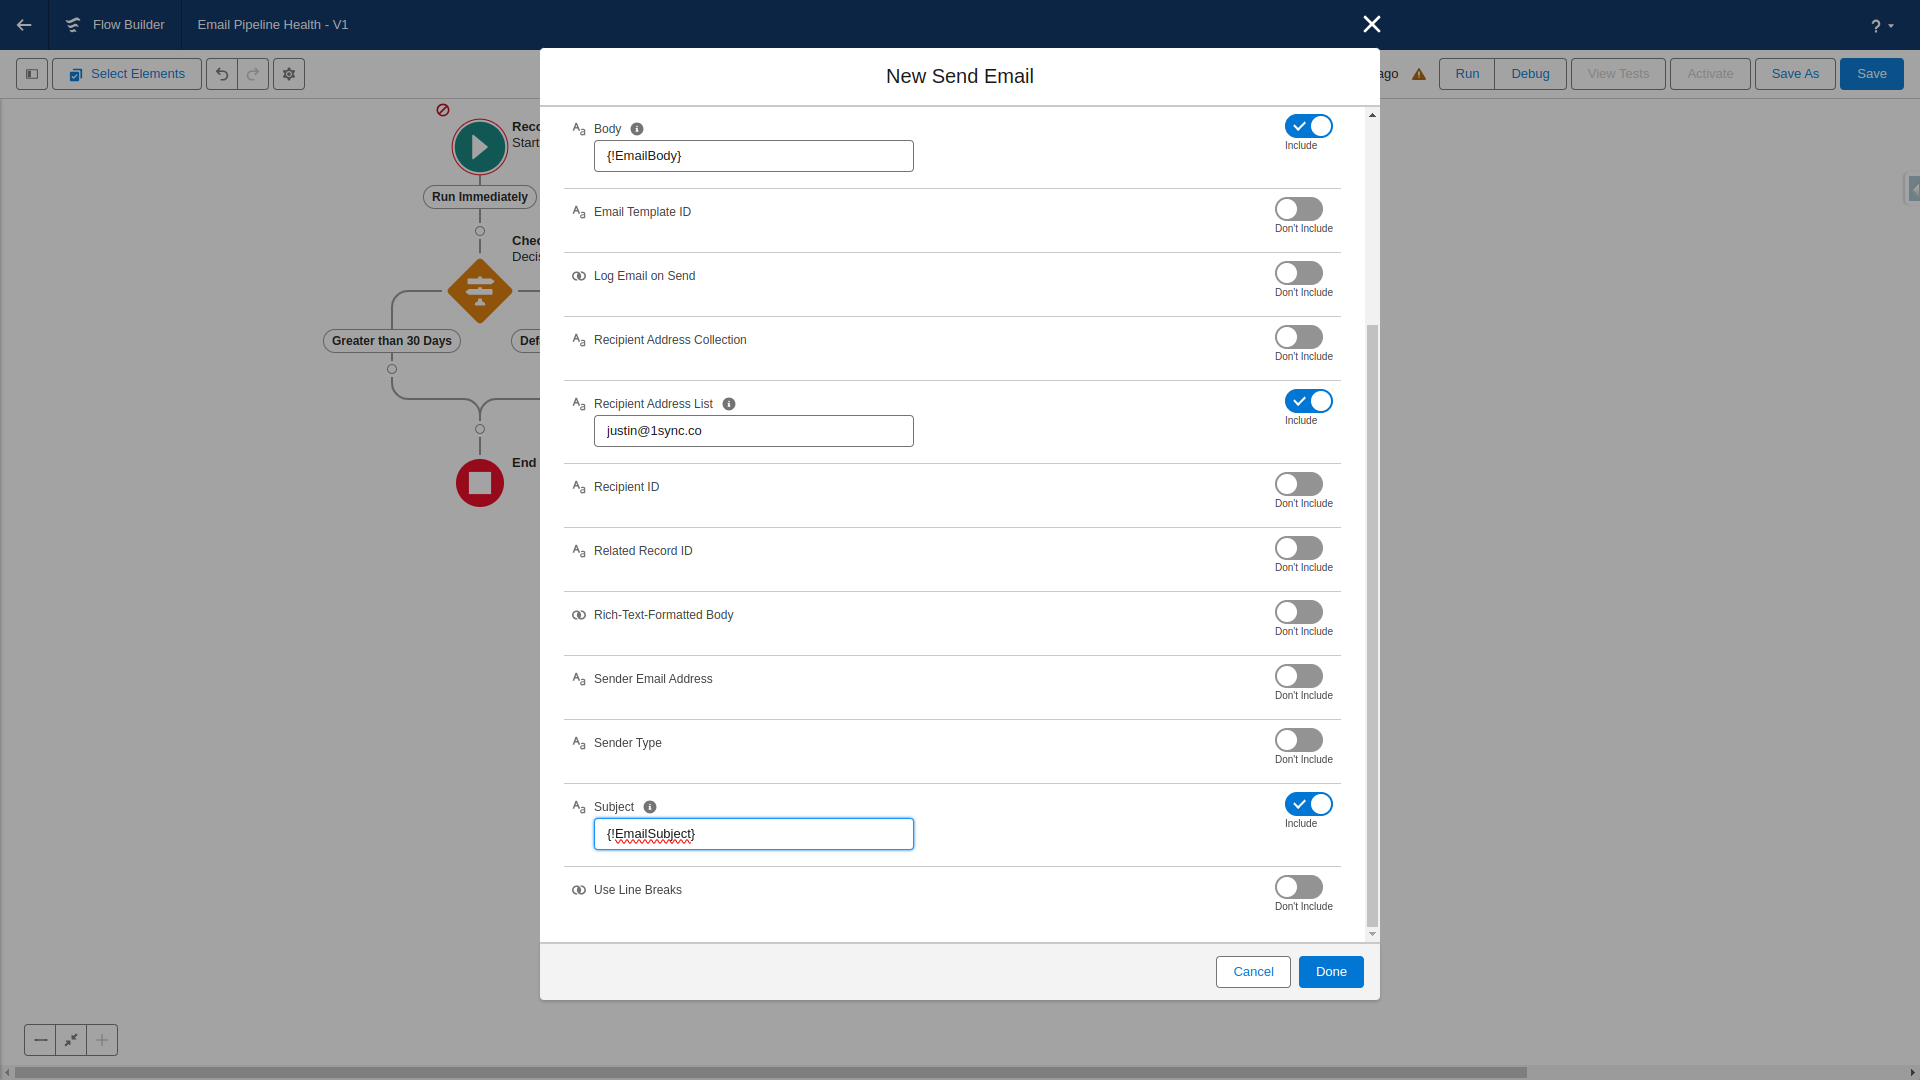
You can see the entire flow and resources used below:
Scenario 4 - Duplicating Records with User Input
Suppose your company frequently duplicates opportunities with minor modifications. You want to streamline this process by creating a screen flow to collect necessary data and duplicate the record.
This is a great example of new functionality that is brought to flow, and was not possible inside of process builder.
Create In Flow
Inside of flow builder, we can:
- Create a
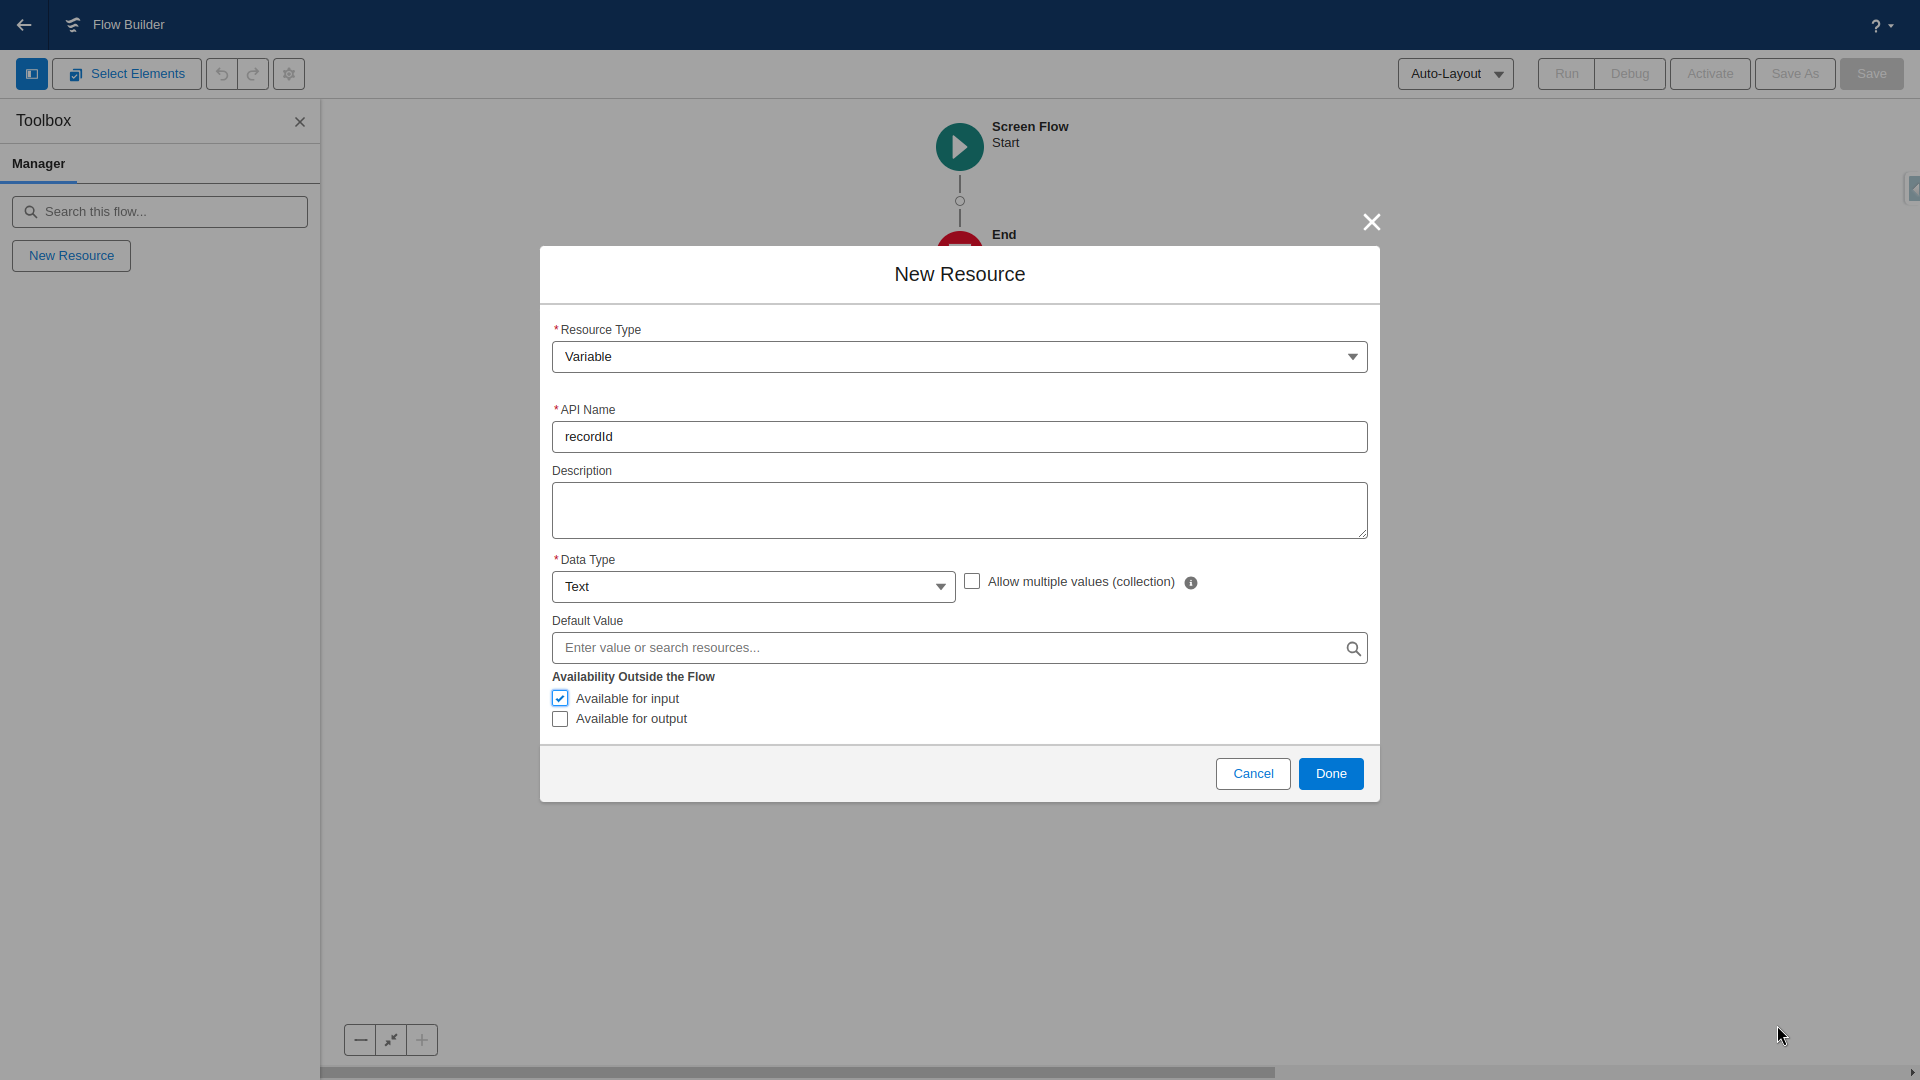
Screen Flow - Open the toolbox on the left
- Create a new variable resource
- call the resource
recordId- this is case-sensitive
- Select the data type as text
- Mark available for input
- Save
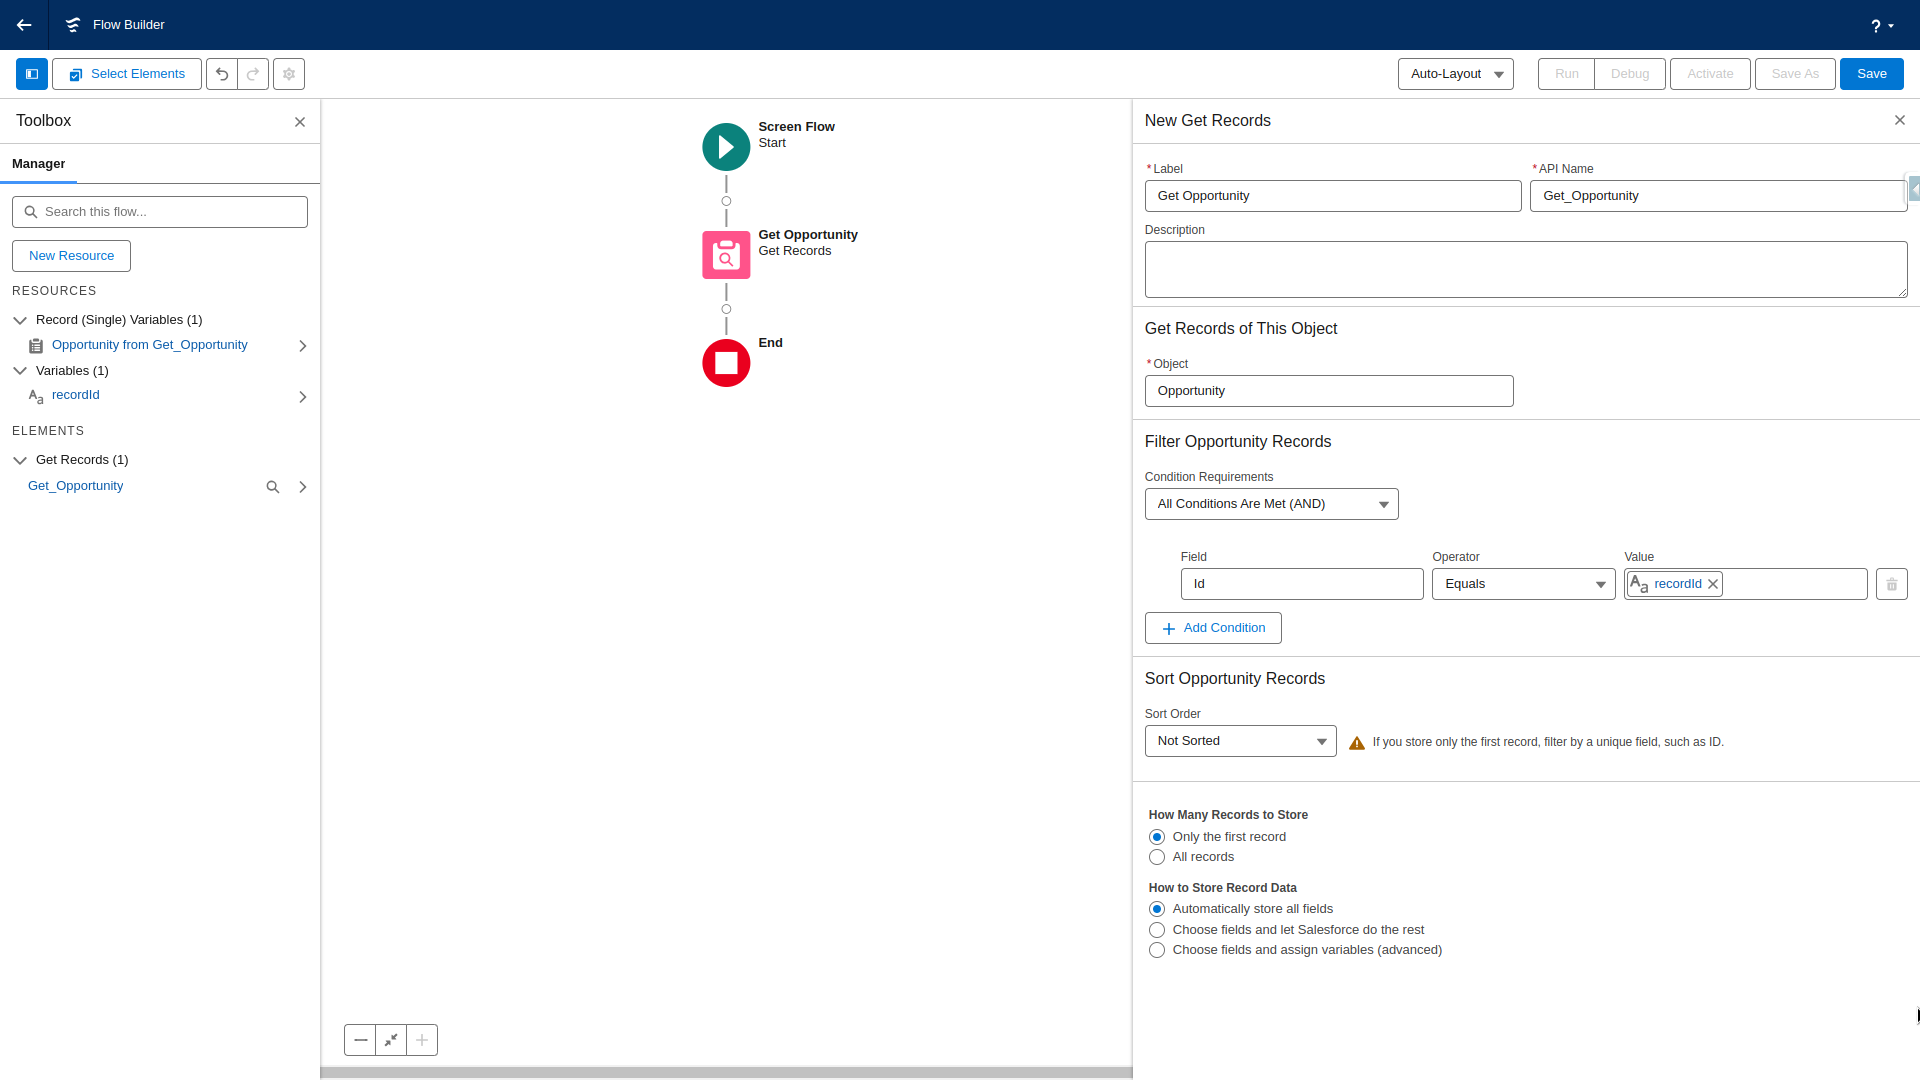
We can then get the record the action passes into the flow using a get record element. We:
- Give the element a name
- Select the object as
Opportunity - Make the filter the opportunity id equals the record id
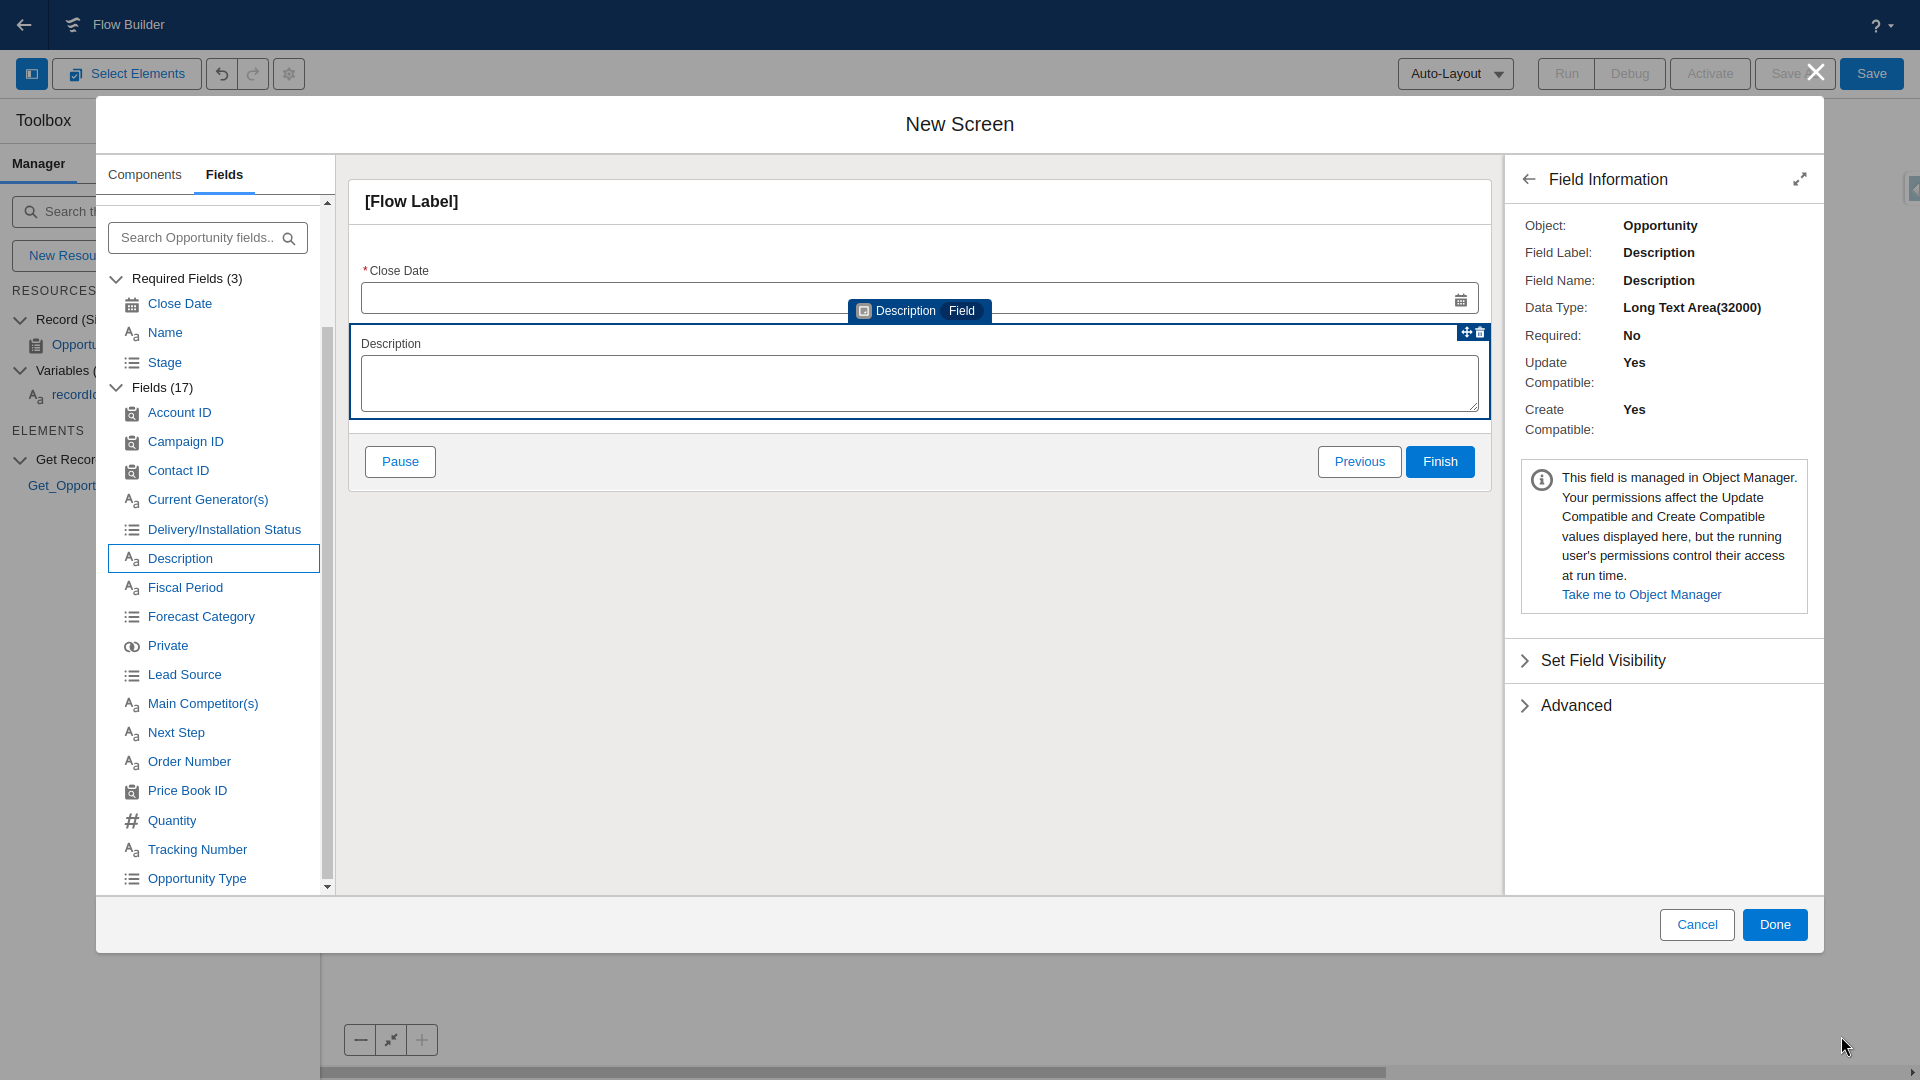
Then, we can then take user input using the Screen element.
- Add a screen element and give it a name
- On the left side of the screen, go to the fields section.
- We can use the
Record Variableto directly edit values from the opportunity retrieved previously - We can select this variable, then drag it's fields that we want to edit.
- In this case, we will want to edit the close date and the description.
- We can use the
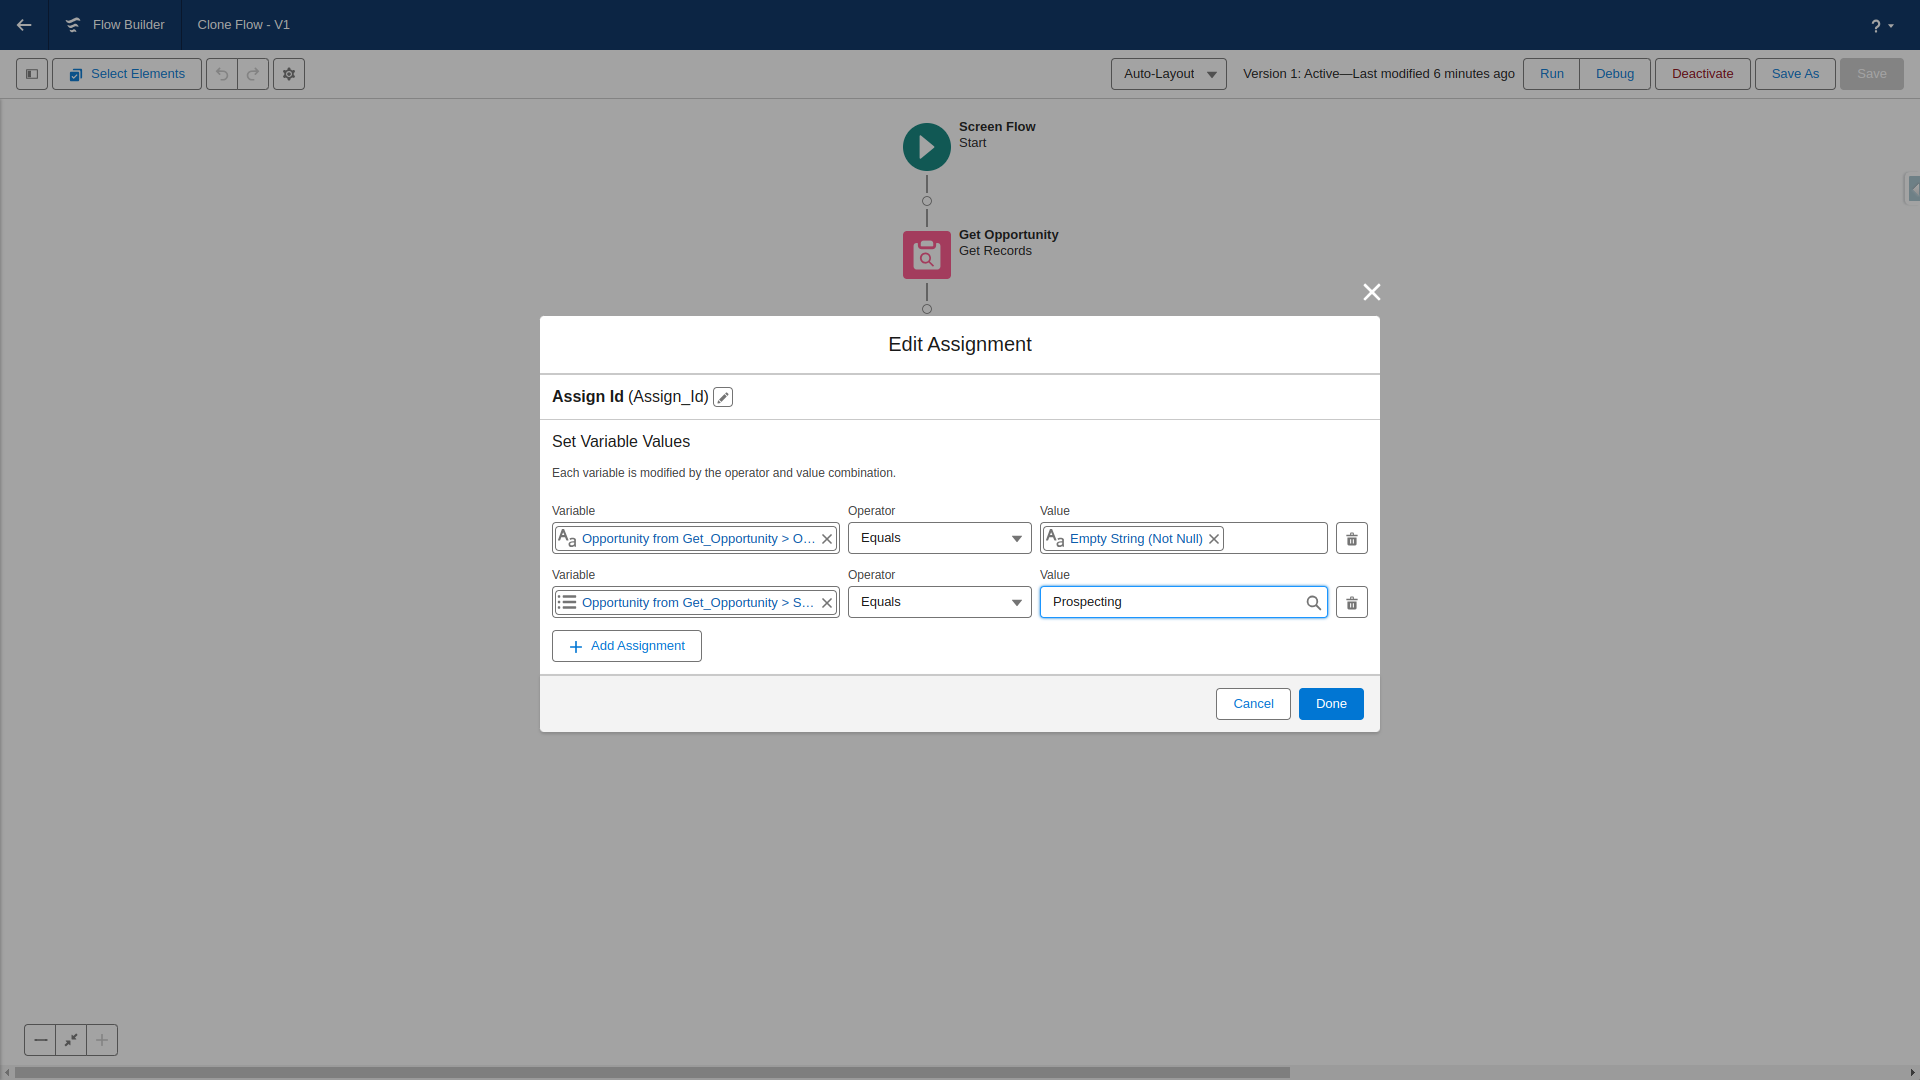
From here, we need to prep the record for insert. We can use the assignment element to edit a few field's values on the original record.
To achieve this, we can:
- Set the opportunity's id as
Empty String. This is a required step to properly insert the record. - Set the stage as
Prospecting, to ensure that new opportunities are not created as closed won.
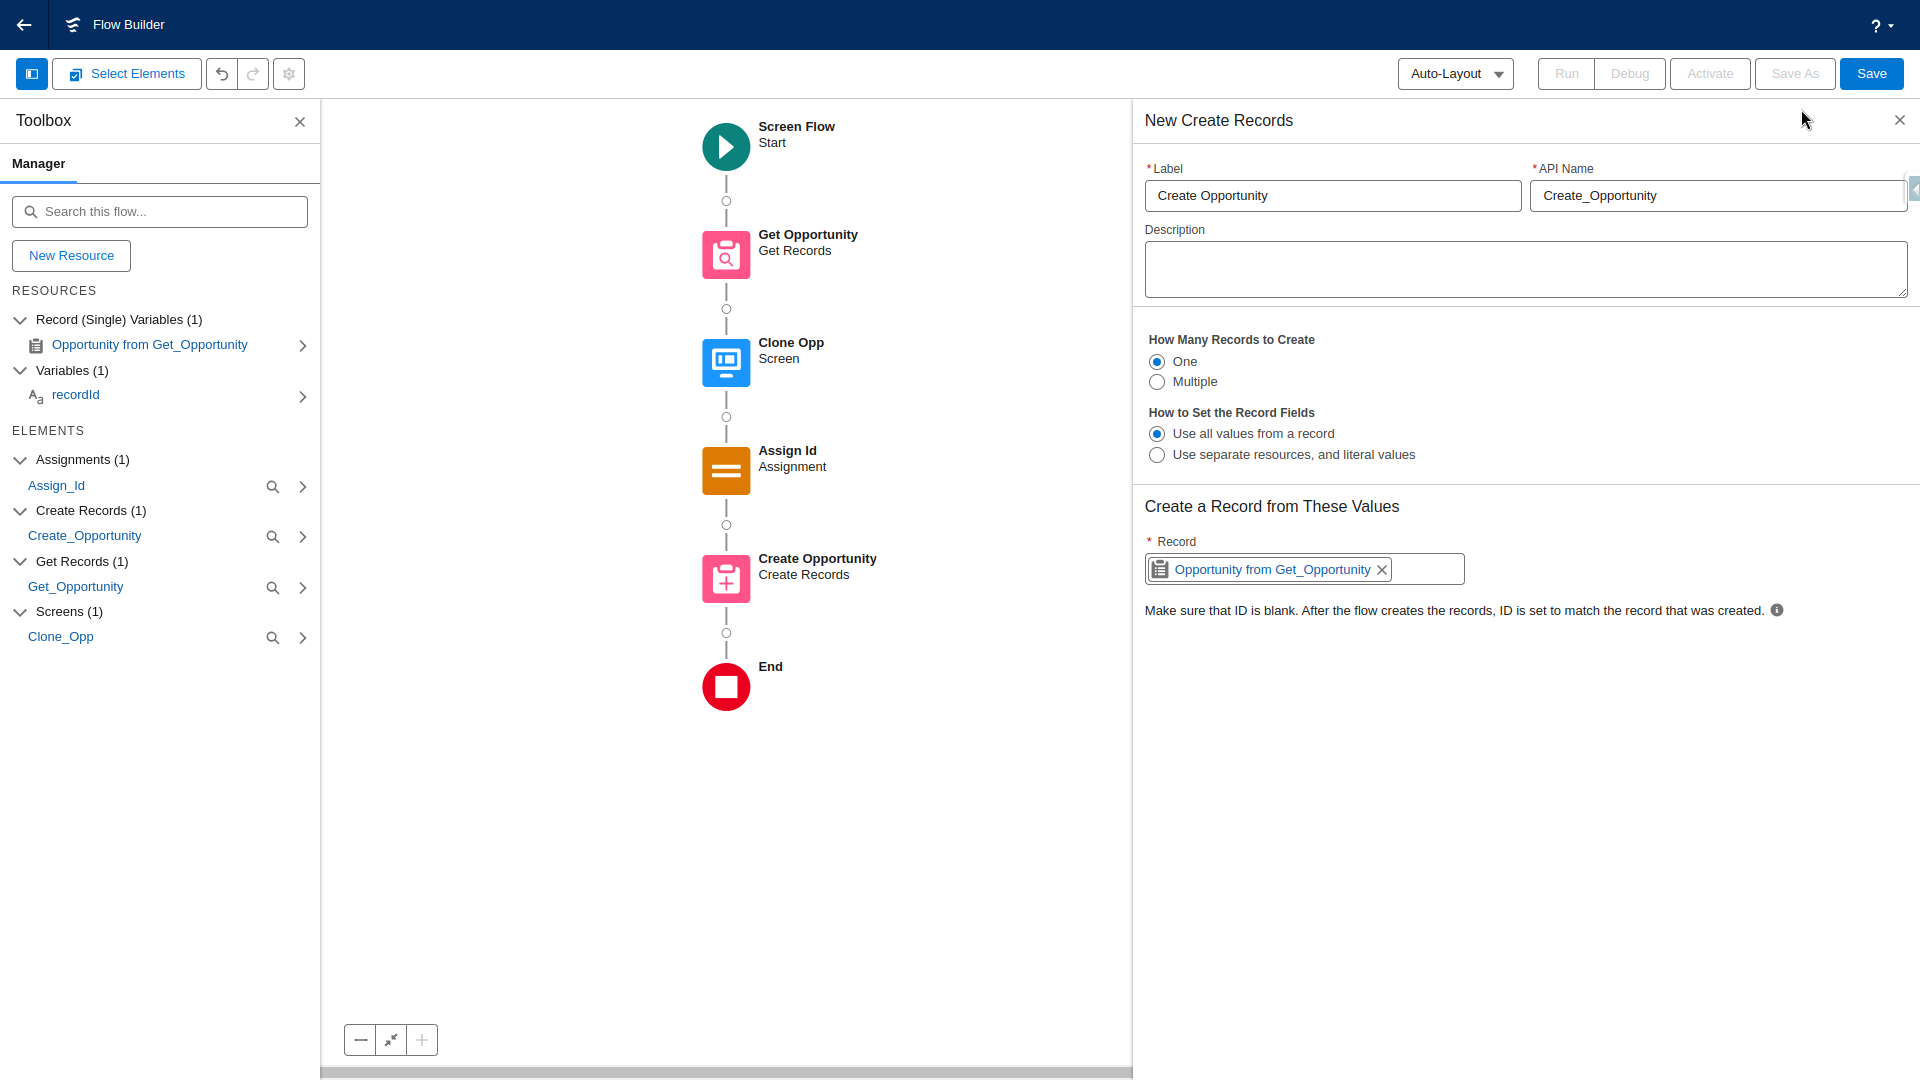
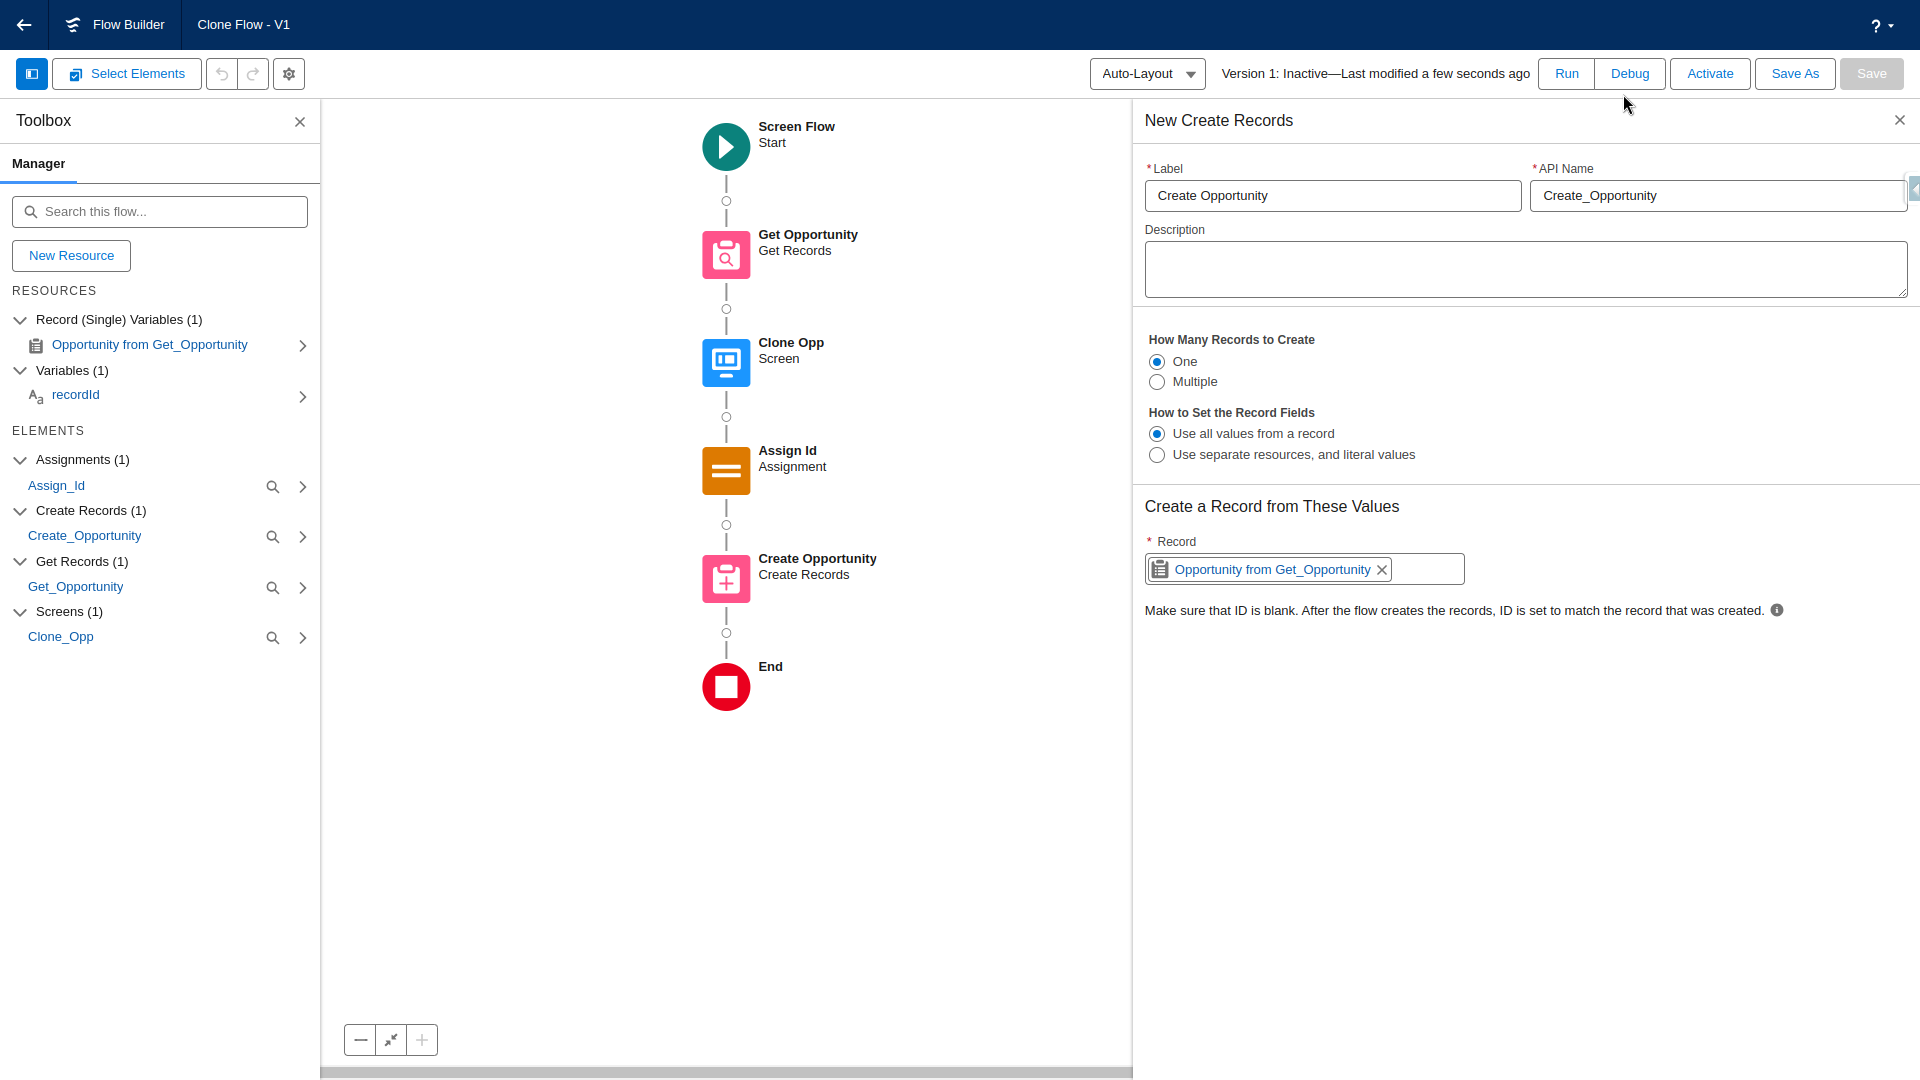
Then, we can add a Create Records element. This will save the duplicate record. We can give it a name, then select the opportunity variable.
From here, we can save the flow, activate, and add it to the page layout.
Navigate to Opportunity inside the object manager, and:
- Go to
Buttons, Links, and Actions - Create a new action
- Change the action type to flow
- Give it a name
- Save
Then, we want to add this to the page layout. Go back to Opportunity inside the object manager, then:
- Go to
Page Layouts - Select the relevant page layout
- Go to the
Mobile & Lightning Actionssection - Drag the
Clone Oppaction to the page layout - Save the page
You can see the flow built in the screenshot below:
Conclusion
By mastering Salesforce Flow, businesses can streamline operations, automate repetitive tasks, and enhance overall efficiency. These scenarios offer a glimpse into the versatility and power of Flow in addressing diverse business needs.
If you're interested in more Salesforce content, consider check out the video I made describing these scenarios.
