How to Use Named Credentials in Salesforce
Learn how to use Salesforce Named Credentials for secure authentication with third-party systems. Simplify OAuth 2.0 workflows for integrations.
Managing authentication in Apex can be tricky. It is best practice to store your credentials outside of your Apex code.
We can use named credentials to store and authenticate to third-party systems. Using named credentials, we can streamline the Oauth 2.0 workflow using them. I recently implemented named credentials for my Quickbooks Online -> Salesforce integration, QIME. In this blog post, I will walk you through:
- How to implement a custom Auth Provider.
- How to configure the new named credential.
- An example of how to use named credentials in apex.
- How to authenticate to a third-party system with OAuth 2.0 (QBO)
Named Credential Changes Summer 23' Release
With the release of Summer '23, named credentials have been completely overhauled. The new architecture allows us to use the same credentials, across many endpoints.
With the new changes,
- Named Credential
- Auth. Provider
- External Credential
- Custom Metadata
Are all metadata that needed for Oauth 2.0 in Salesforce. Each of these components serve different roles within the authentication process. To get started, we need to create Custom Metadata. This will store credential information about the integration.
Configure Custom Metadata
The Auth. Provider uses custom metadata to store the credentials. For QIME, we created a Custom Metadata type: QB Credential (API Name: QB_Credential)
We also need to create custom fields to store essential data. These fields for an OAuth 2.0 integration are:
- Auth URL
- Callback URL
- Client Id
- Client Secret
- Scope
- Token URL
We also store two QBO specific fields in:
- Realm Id
- MinorVersion
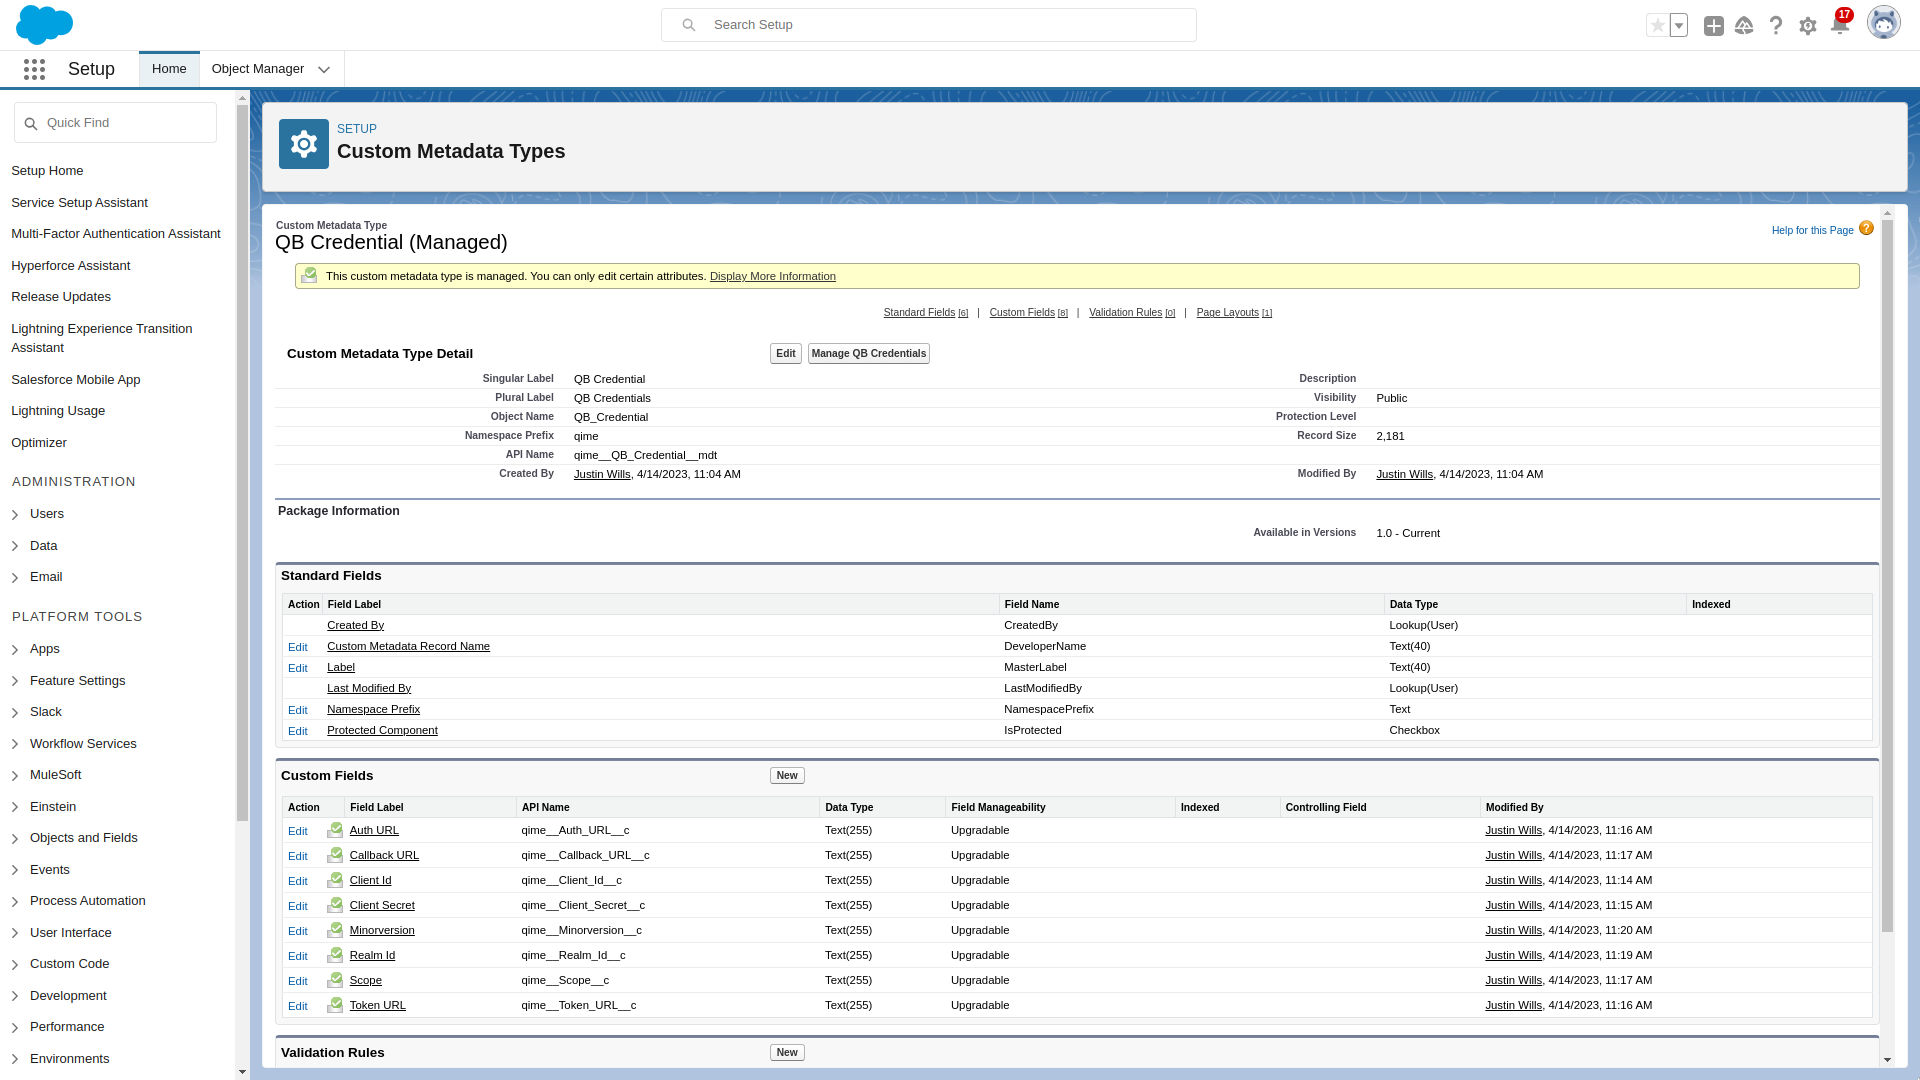
This allows us to store a record inside the metadata to hold our Auth. Provider plugin.
Custom Auth. Provider Example
We need to use a custom Auth. Provider plugin for third-party integrations.
Extend the Auth.AuthProviderPluginClass interface in the class QBAuthProvider:
global class QBAuthProvider extends Auth.AuthProviderPluginClass {
    public String redirectUrl; // use this URL for the endpoint that the authentication provider calls back to for configuration
    private String key;
    private String secret;
    private String scope;
    private String authUrl;    // application redirection to the QBO website for authentication and authorization
    private String accessTokenUrl; // uri to get the new access token from QBO using the GET verb
    private String customMetadataTypeApiName = 'qime__QB_Credential__mdt';
}
We want to store data when the QBAuthProvider object is initialized. The API name for the Auth Provider under the customMetadataTypeApiName is also set.
We then want to implement a getter method to access the metadata name:
/**
 * @description Get the static value of the custom metadata name
 * @return Developer name of custom metadata name
 */
global String getCustomMetadataType() {
	return customMetadataTypeApiName;
}
Then we use the initiate function to create the url used to initiate the OAuth 2.0 user flow.
/**
 * @description Initiate OAuth 2.0 sequence
 * @return OAuth 2.0 page start
 */
global PageReference initiate(Map<string,string> authProviderConfiguration, String stateToPropagate) {
	key = authProviderConfiguration.get('Client_Id__c');
	authUrl = authProviderConfiguration.get('Auth_URL__c');
	scope = authProviderConfiguration.get('Scope__c');
	redirectUrl = authProviderConfiguration.get('Callback_URL__c');
	String urlToRedirect = authUrl+'?response_type=code&client_id='+key+'&redirect_uri='+redirectUrl+'&scope='+scope+
					'&state='+stateToPropagate;
	PageReference pageRef = new PageReference(urlToRedirect);
	return pageRef;
}
The authProviderConfiguration is a map of strings. This gives us type-safe access to the config data. The API Names of the custom metadata fields are the keys.
Next, we want to handle the callback function. This is the stage of OAuth 2.0 when the access token is granted to the system. We can do so by implementing the handleCallback method:
/**
 * @description Handle OAuth 2.0 callback
 * @return Wrapped Oauth2.0 token data
 */
global Auth.AuthProviderTokenResponse handleCallback(Map<string,string> authProviderConfiguration, Auth.AuthProviderCallbackState state ) {
	//Here, the developer will get the callback with actual protocol.
	//Their responsibility is to return a new object called AuthProviderToken
	//This will contain an optional accessToken and refreshToken
	key = authProviderConfiguration.get('Client_Id__c');
	secret = authProviderConfiguration.get('Client_Secret__c');
	accessTokenUrl = authProviderConfiguration.get('Token_URL__c');
	authUrl = authProviderConfiguration.get('Auth_URL__c');
	scope = authProviderConfiguration.get('Scope__c');
	redirectUrl = authProviderConfiguration.get('Callback_URL__c');
	Map<String,String> queryParams = state.queryParameters;
	String code = queryParams.get('code');
	String sfdcState = queryParams.get('state');
	HttpRequest req = new HttpRequest();
	String url = accessTokenUrl;
	String header = 'Basic ' + EncodingUtil.base64Encode(Blob.valueOf(key + ':' + secret));

	String body = 'code=' + code + '&grant_type=authorization_code&redirect_uri=' + redirectUrl ;
	req.setEndpoint(url);
	req.setHeader('Authorization', header);
	req.setHeader('Accept','application/json');
	req.setHeader('Content-Type','application/x-www-form-urlencoded');

	req.setBody(body);
	req.setMethod('POST');

	Http http = new Http();
	HTTPResponse res = http.send(req);
	String responseBody = res.getBody();
	BearerTokenWrapper wrapper = (BearerTokenWrapper)System.JSON.deserialize(responseBody, BearerTokenWrapper.class);

	return new Auth.AuthProviderTokenResponse('QBO', wrapper.access_token, wrapper.refresh_token, sfdcState);
}
We build a request to send to QBO, and QBO will return us an object containing:
- Access Token
- Refresh Token
- Other Data that is not relevant to this process
We can then use a class, like BearerTokenWrapper to parse the JSON data into an Apex object like so:
/**
 * @description Wrapper class to parse OAuth token data
 */
@SuppressWarnings('PMD.PropertyNamingConventions, PMD.VariableNamingConventions, PMD.FieldNamingConventions')
public class BearerTokenWrapper{
	public Integer x_refresh_token_expires_in;
	public String refresh_token {get; set;}
	public String access_token {get;set;}
	public Integer expires_in;
	public String token_type;
}
This data is then returned through the AuthProviderTokenResponse.
The last important piece of OAuth 2.0 is refreshing the access token. We can do so by implementing the optional refresh method like so:
/**
 * @description Handle OAuth 2.0 refresh
 * @return Wrapped Oauth2.0 refresh data
 */
global override Auth.OAuthRefreshResult refresh(Map<String,String> authProviderConfiguration, String refreshToken) {
	HttpRequest req = new HttpRequest();
	req.setEndpoint(authProviderConfiguration.get('Token_URL__c'));

	String clientId = authProviderConfiguration.get('Client_Id__c');
	String clientSecret = authProviderConfiguration.get('Client_Secret__c');

	req.setMethod('POST');
	req.setHeader('Content-Type','application/x-www-form-urlencoded');
	req.setHeader('Accept','application/json');

	String header = 'Basic ' + EncodingUtil.base64Encode(Blob.valueOf(clientId + ':' + clientSecret));
	req.setHeader('Authorization', header);

	String body = 'grant_type=refresh_token&refresh_token=' + refreshToken;
	req.setBody(body);

	Http http = new Http();
	HTTPResponse res = http.send(req);

	BearerTokenWrapper response = (BearerTokenWrapper) JSON.deserialize(res.getBody(), BearerTokenWrapper.class);

	return new Auth.OAuthRefreshResult(response.access_token, response.refresh_token);
}
This method allows us to refresh the access token when it expires.
The last required method to put in place is the getUserInfo method. This is part of the openId spec. QIME uses fake data for this method. You need to pass in valid strings for the AuthProvider plugin to function as expected. We can do this like so:
/**
 * @description Handle OAuth 2.0 user info
 * @return Wrapped Oauth2.0 user data
 */
global Auth.UserData  getUserInfo(Map<string,string> authProviderConfiguration, Auth.AuthProviderTokenResponse response) {
	System.debug(LoggingLevel.WARN, 'getUserInfo-config: ' + authProviderConfiguration);
	System.debug(LoggingLevel.WARN, 'getUserInfo-response: ' + response);
	return new Auth.UserData('fakeId', 'first', 'last', 'first last', 'email', 'link', 'locale', null, 'QBAuth', null, null);

}
And that is everything we need to implement the Auth.AuthProviderPluginClass interface. The full class details are here.
Custom Auth. Provider Plugin Test Class
No Salesforce code is complete without test code. The sample test code for the Auth Provider Plugin is as follows:
@IsTest
public class QBAuthProviderTest {
        private static final String OAUTH_TOKEN = 'access_token';
        private static final String STATE = 'mocktestState';
        private static final String REFRESH_TOKEN = 'refresh';
        private static final String LOGIN_ID = 'fakeId';
        private static final String USERNAME = 'testUsername';
        private static final String FIRST_NAME = 'first';
        private static final String LAST_NAME = 'last';
        private static final String EMAIL_ADDRESS = 'email';
        private static final String LOCALE_NAME = 'locale';
        private static final String FULL_NAME = FIRST_NAME + ' ' + LAST_NAME;
        private static final String PROVIDER = 'QBAuth';
        private static final String REDIRECT_URL =
        'http://salesforce/services/callback';
        private static final String KEY = 'testKey';
        private static final String SECRET = 'testSecret';
        private static final String SCOPE = 'scope';
        private static final String STATE_TO_PROPOGATE = 'testState';
        private static final String ACCESS_TOKEN_URL =
        'https://appcenter.intuit.com/accessTokenUri';
        private static final String API_USER_VERSION_URL =
        'https://appcenter.intuit.com/user/20/1';
        private static final String AUTH_URL =
        'https://appcenter.intuit.com/authurl';
        private static final String API_USER_URL =
        'https://appcenter.intuit.com/user/api';

    /**
     * Setup test data for Named credential parameters
     * @return Map of custom metadata values
     */
    private static Map<String,String> setupAuthProviderConfig ()
    {
        Map<String,String> authProviderConfiguration = new Map<String,String>();
        authProviderConfiguration.put('Client_Id__c', KEY);
        authProviderConfiguration.put('Auth_URL__c', AUTH_URL);
        authProviderConfiguration.put('Client_Secret__c', SECRET);
        authProviderConfiguration.put('Token_URL__c', ACCESS_TOKEN_URL);
        authProviderConfiguration.put('API_User_Url__c',API_USER_URL);
        authProviderConfiguration.put('API_User_Version_Url__c',
        API_USER_VERSION_URL);
        authProviderConfiguration.put('Scope__c', SCOPE);
        authProviderConfiguration.put('Callback_URL__c',REDIRECT_URL);
        return authProviderConfiguration;

    }

    @isTest static void testInitiateMethod()
    {
        String stateToPropogate = 'mocktestState';
        Map<String,String> authProviderConfiguration = setupAuthProviderConfig();
        QBAuthProvider authProv = new QBAuthProvider();
        authProv.redirectUrl = authProviderConfiguration.get('Callback_URL__c');
        PageReference expectedUrl = new PageReference(authProviderConfiguration.get('Auth_URL__c') + '?client_id='+
        authProviderConfiguration.get('Client_Id__c') +'&response_type=code&scope=scope&redirect_uri='+
        authProviderConfiguration.get('Callback_URL__c') + '&state=' +
        STATE_TO_PROPOGATE);
        PageReference actualUrl = authProv.initiate(authProviderConfiguration, STATE_TO_PROPOGATE);
        System.assertEquals(expectedUrl.getUrl(), actualUrl.getUrl());
    }

    @isTest static void testHandleCallback()
    {
        Map<String,String> authProviderConfiguration =
        setupAuthProviderConfig();
        QBAuthProvider authProv = new QBAuthProvider();
        authProv.redirectUrl = authProviderConfiguration.get
        ('Redirect_Url_c');

        Test.setMock(HttpCalloutMock.class, new
        QBAuthMockHttpResponseGenerator());

        Map<String,String> queryParams = new Map<String,String>();
        queryParams.put('code','code');
        queryParams.put('state',authProviderConfiguration.get('State_c'));
        Auth.AuthProviderCallbackState cbState =
        new Auth.AuthProviderCallbackState(null,null,queryParams);
        Auth.AuthProviderTokenResponse actualAuthProvResponse =
        authProv.handleCallback(authProviderConfiguration, cbState);
        Auth.AuthProviderTokenResponse expectedAuthProvResponse =
        new Auth.AuthProviderTokenResponse(
        'QBO', OAUTH_TOKEN, REFRESH_TOKEN, null);

        System.assertEquals(expectedAuthProvResponse.provider,
        actualAuthProvResponse.provider);
        System.assertEquals(expectedAuthProvResponse.oauthToken,
        actualAuthProvResponse.oauthToken);
        System.assertEquals(expectedAuthProvResponse.oauthSecretOrRefreshToken,
        actualAuthProvResponse.oauthSecretOrRefreshToken);
        System.assertEquals(expectedAuthProvResponse.state,
        actualAuthProvResponse.state);

    }

    @isTest static void testGetUserInfo()
    {
        Map<String,String> authProviderConfiguration =
        setupAuthProviderConfig();
        QBAuthProvider authProv = new QBAuthProvider();

        Test.setMock(HttpCalloutMock.class, new
        QBAuthMockHttpResponseGenerator());

        Auth.AuthProviderTokenResponse response =
        new Auth.AuthProviderTokenResponse(
        PROVIDER, OAUTH_TOKEN ,'sampleOauthSecret', STATE);
        Auth.UserData actualUserData = authProv.getUserInfo(
        authProviderConfiguration, response) ;

        Map<String,String> provMap = new Map<String,String>();
        provMap.put('key1', 'value1');
        provMap.put('key2', 'value2');

        Auth.UserData expectedUserData = new Auth.UserData(LOGIN_ID,
        FIRST_NAME, LAST_NAME, FULL_NAME, EMAIL_ADDRESS,
        null, LOCALE_NAME, null, PROVIDER, null, provMap);

        System.assertNotEquals(expectedUserData,null);
        System.assertEquals(expectedUserData.firstName,
        actualUserData.firstName);
        System.assertEquals(expectedUserData.lastName,
        actualUserData.lastName);
        System.assertEquals(expectedUserData.fullName,
        actualUserData.fullName);
        System.assertEquals(expectedUserData.email,
        actualUserData.email);
        System.assertEquals(expectedUserData.username,
        actualUserData.username);
        System.assertEquals(expectedUserData.locale,
        actualUserData.locale);
        System.assertEquals(expectedUserData.provider,
        actualUserData.provider);
        System.assertEquals(expectedUserData.siteLoginUrl,
        actualUserData.siteLoginUrl);
    }


    /**
     * Implement a mock http response generator for QBAuth.
     */
    public class QBAuthMockHttpResponseGenerator implements HttpCalloutMock
    {
        public HTTPResponse respond(HTTPRequest req)
        {
            // Create a fake response
            HttpResponse res = new HttpResponse();
            res.setHeader('Content-Type', 'application/json');
            res.setBody('{"x_refresh_token_expires_in":8726208,"refresh_token":"refresh","access_token":"access_token","token_type":"bearer","expires_in":3600}');
            res.setStatusCode(200);
            return res;
        }

    }
}
Configuring the Auth. Provider
It's time to configure the Auth. Provider inside of the Salesforce Setup menu. We can navigate to the menu by going to Setup -> Auth. Provider.
From here we can:
- Create a new Auth. Provider
- Select the Provider type of
QBAuthProvider - Enter the following details:
Go to Setup -> Auth. Providers and create a new Auth. Provider with the following configuration:
- Provider Type:
QBAuthProvider - Name:
QB Auth Provider - URL Suffix:
QB_Auth_Provider - Auth URL:
https://appcenter.intuit.com/connect/oauth2 - Token URL:
https://oauth.platform.intuit.com/oauth2/v1/tokens/bearer - Scope:
com.intuit.quickbooks.accounting - Realm Id: The company Id copied before
- Minorversion:
65 - Execute Registration As: Any Admin User
At the bottom of the page, there are links to initialize and test the Auth. Provider. Take the Callback URL in the Salesforce Configuration section. Copy this into the Callback URL in the Auth. Provider Detail section.
Additionally, in the QuickBooks App, add the Callback URL as a redirect URI.
Now we can test everything is working. In the Auth. Provider page, open the Test-Only Initialization URL in a new tab. Sign into the desired QuickBooks account. You should see a page full of data in an xml format.
External Credential
External Credentials are new in Winter 23'. They extend the Named Credentials. External Credentials are now the base authentication layer. Named Credentials store endpoints and other settings to share authentication.

To create an External credential, go to Setup -> Named Credentials . Find the External Credentials tab. From here, create a new record with the following properties:
- Label:
QB External Credential - Name:
QB External Credential - Authentication Protocol:
OAuth 2.0 - Authentication Flow Type:
Browser Flow - Authentication Provider:
QBAuthProvider
Named Credential
We can create the named credential that will authenticate to QBO. Apex code can use the information from the named credential to authenticate. Go to the Named Credential tab and create a new record:
- Label:
QB Named Credential - Name:
QB_Named_Credential - URL:
https://quickbooks.api.intuit.com - External Credential:
QB External Credential - Generate Authorization Header:
False - Allow Formulas in HTTP Header:
True - Allowed Namespaces:
QIME
This allows us to reference the named credential in Apex.
Named Credential Principals
Principals specify authentication to the external system. We can define this as:
- Named Principal
- Per User Principal Additionally, an order can be assigned to the principals.
To create authentication for all users, create a principal with the following data:
- Parameter Name:
QBO Principal - Sequence Number:
1 - Identity Type:
Named Principal
After this is created, we can authenticate with QBO. On the principal record, open the sub-menu and click Authenticate. Salesforce is now authenticated with QBO.
A few things to note about the Named Credential configuration:
- You will still need to create remote site settings to authenticate to third party systems.
- The refresh token does not automatically refresh.
- If the refresh token expires, you need to go through the browser flow again.
Named Credential Permissions
One last thing we need in place to authenticate users is a permission set. We can create a permission set QBO User and apply to users that need access to the third party system.
Inside your permission set, go to External Credential Principal Access. Add the external credential created earlier.
After assigning the permission set, end users can now access the named credential.
Using Named Credentials In Apex
Now it's time to Named Credential in Apex. To get the extra information from the Auth. Provider, we can query the metadata like so:
List<QB_Credential__mdt> creds = [SELECT Id, Realm_Id__c, MinorVersion__c FROM QB_Credential__mdt WHERE DeveloperName = 'QB_Auth_Provider'];This will allow us to use the minor version and realm id inside our code.
Additionally, we can call the named credential like so:
req.setEndpoint('callout:QB_Named_Credential/');This will call the base endpoint. So if we need a specific resource for QBO, the callout would look like this:
req.setEndpoint('callout:QB_Named_Credential/' + 'v3/company/realmId/customer');With QBO, we need to use a custom authentication header. We can do this with Allow Formulas in HTTP Header in the Named Credential configuration. To use the merge fields, perform the following:
req.setHeader('Authorization', 'Bearer {!$Credential.OAuthToken}');And that is everything you need to get named credentials working.
Downsides Of Named Credentials
Some of the downsides of using named credentials include:
- Needing to schedule jobs to refresh the refresh token.
- Named credentials do not work in a managed package.
Conclusion
Named Credentials are a great way of moving credentials out of Salesforce. They simplify the OAuth 2.0 workflow. And, are an easy solution for integration third-party data with Salesforce.
FAQ
Named Credential Permissions
If you see the error:
The callout couldn't access the endpoint. You might not have the required permissions, or the named credential "QB_Named_Credential" might not exist.
The permissions are not configured correctly. To ammend ensure that:
- The Name Credential API Name matches in the UI and in Apex code.
- The named credential principal access to a permission set and assigned to a user.
- The if the named credential is from a managed package, ensure
Allowed Namespaces for Calloutsincludes the package namespace. - Ensure there is read access to the object
User External Credential.
